给大金空气传感器刷ESPHome固件 | Geek DAIKIN Air Sensor meets ESPHome & Home Assistant
Published by yanzeyuan on
大金空气传感器简介 | Daikin Air Sensor Introduction
其实,影响我们生活环境的非生物因素只有简单的四种:光线、温度、空气和水,而在我们努力提高生活品质的同时,慢慢开始意识到这些因素的重要性。三年前,当我开始规划装修这套地上四层地下一层的房子时,光线、温度、空气和水的品质就成为了我首要关心的内容之一。
In fact, there are only four simple abiotic factors that affect our living environment: light, temperature, air and water. While we are working hard to improve our life, we are beginning to realize the importance of these factors. Three years ago, when I started planning to decorate my new house, the quality of light, temperature, air and water became one of my primary concerns.
广州的夏天很热很漫长,为了给全屋提供舒适的温度,经过反复的对比后我选用了大金VRV-N系列的家用中央空调系统,而作为当时系统附带的几个空气传感器,却成为了我经常用来监测重要区域空气质量的数据来源,它能提供温度、湿度、PM2.5、CO2、TVOC这五个关键性数据。可是,它必须配合大金的原装网关来使用,并且只能使用大金自己的APP“金制空气”来查看这些数据,而这些数据仅仅只是能够查看,并无法通过既定好的逻辑来联动和控制我家中的新风系统和地暖系统,甚至它自己的空调系统也无法联动。所以,有一天我随手拔掉了一个大金空气传感器并把它大卸八块,结果发现它的内部做工精良,用料讲究,使用了业内知名的一些传感器组件,故萌发了刷机改造的念头,也就有了这一番的折腾和这篇文章,让我们一起一步一步的拆解和改造大金空气传感器,给它重新刷机,使它能够基于ESPHome的平台接入Home Assistant智能家居系统或者苹果HomeKit系统,实现与其他设备的互联,通过自动化场景来联动相关设备,发挥出它应有的价值!
The summer in Guangzhou is very hot and long. In order to provide a comfortable temperature for the whole house, after repeated comparisons, I chose Daikin VRV-N series home central air-conditioning system, several DAIKIN air sensors attached to the system after that, they became the data source that I often use to monitor the air quality in important areas. It can provide five key data of temperature, humidity, PM2.5, CO2, and TVOC. However, it must be used with Daikin’s original gateway, and can only use Daikin’s APP “Golden Air” to view these data, and these data can only be viewed, cannot be linked with established logic to control the ventilation system and heating system in my house, and even its own air conditioning system cannot be linked. So, one day I unplugged a Daikin air sensor and disassembled it, I found that its internal manufacturing is excellent, the key electronic parts are exquisite, and some well-known sensor components are used, so the idea was born, let us geeking the Daikin air sensor step by step, re-flash it so that it can be connected to the Home Assistant based on the ESPHome platform or Apple’s HomeKit system, and links related devices through automation scenarios!


If you are interested in DAIKIN Air Sensor, welcome to our AliExpress store to buy a brand new one directly.
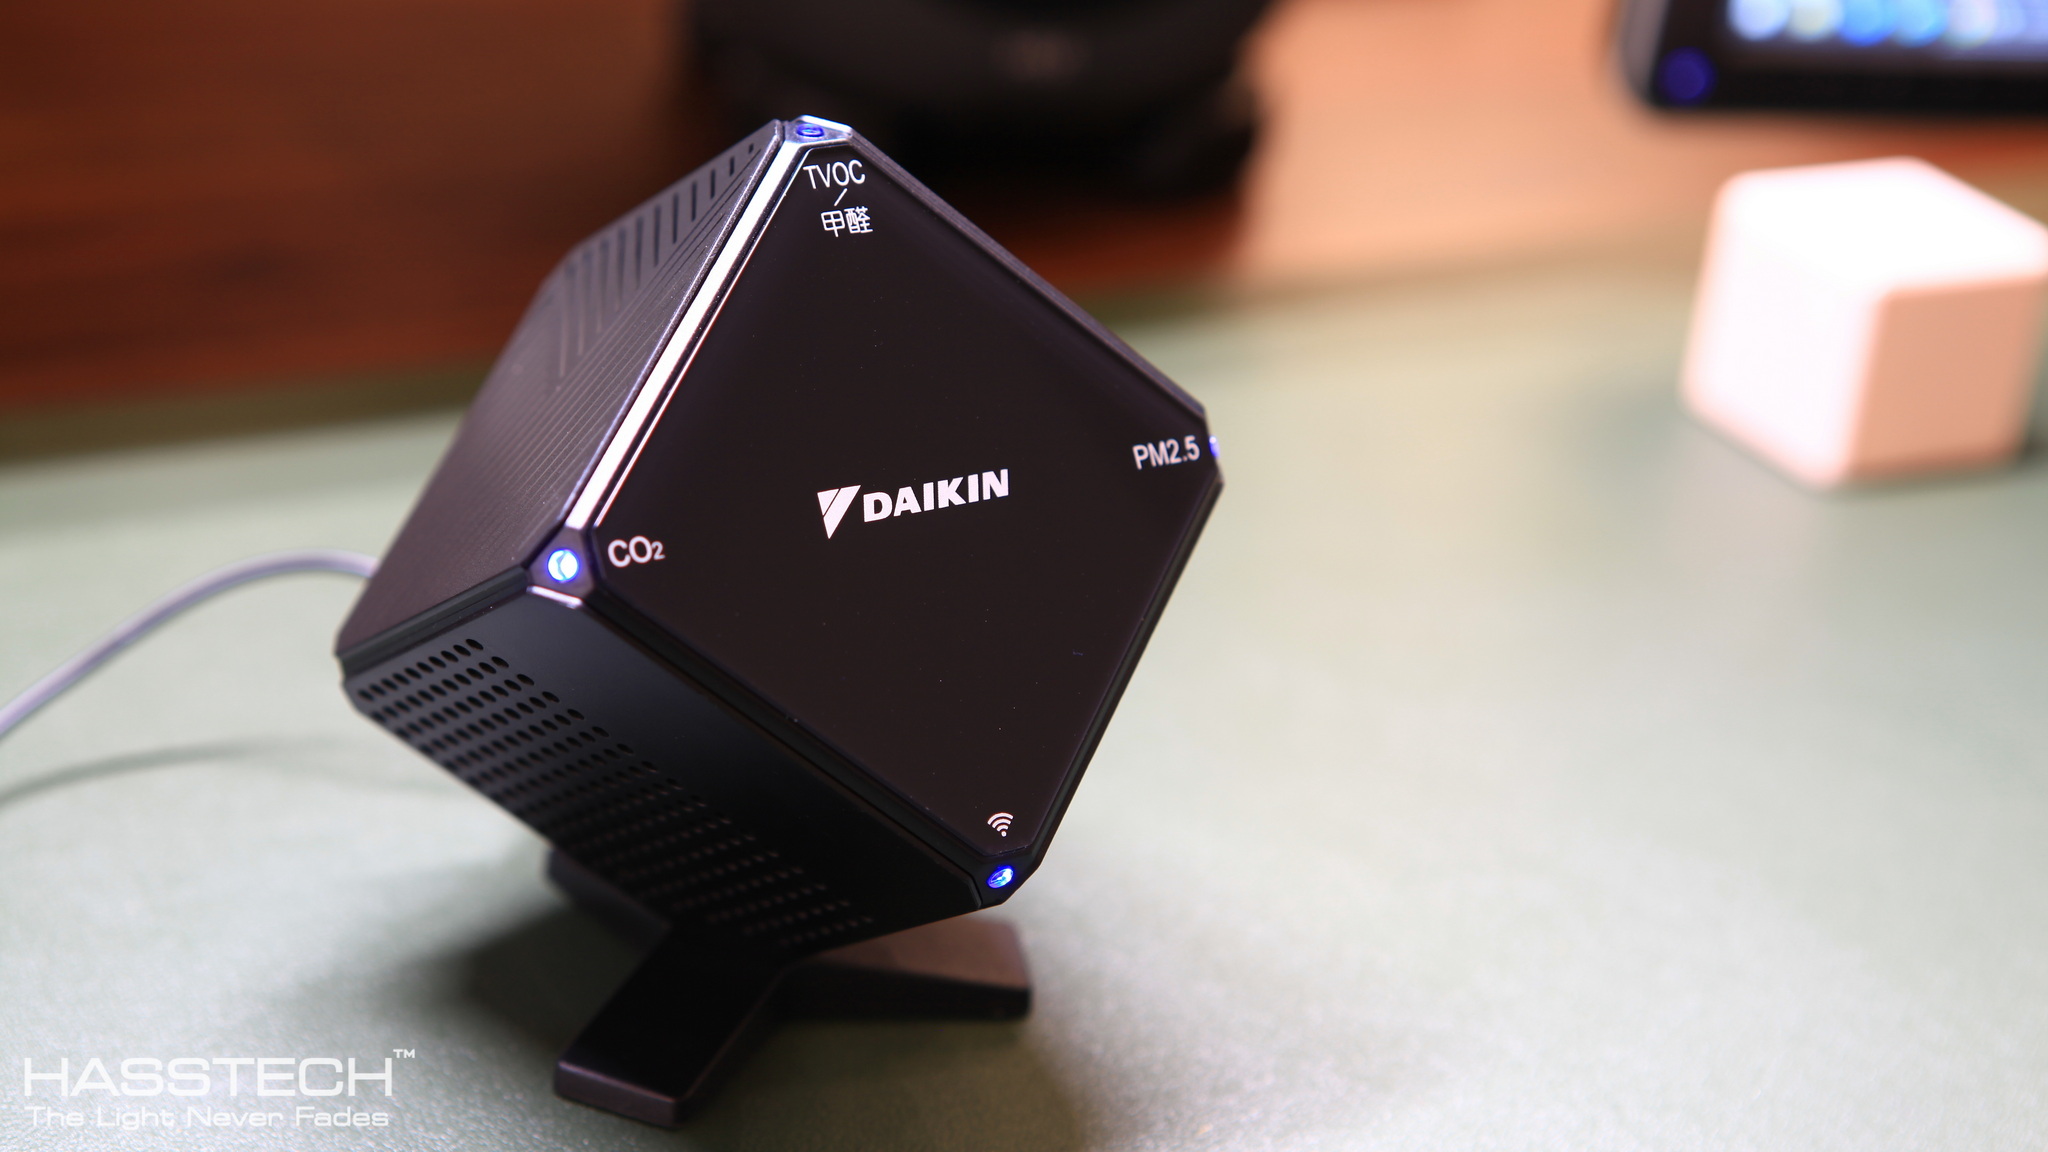
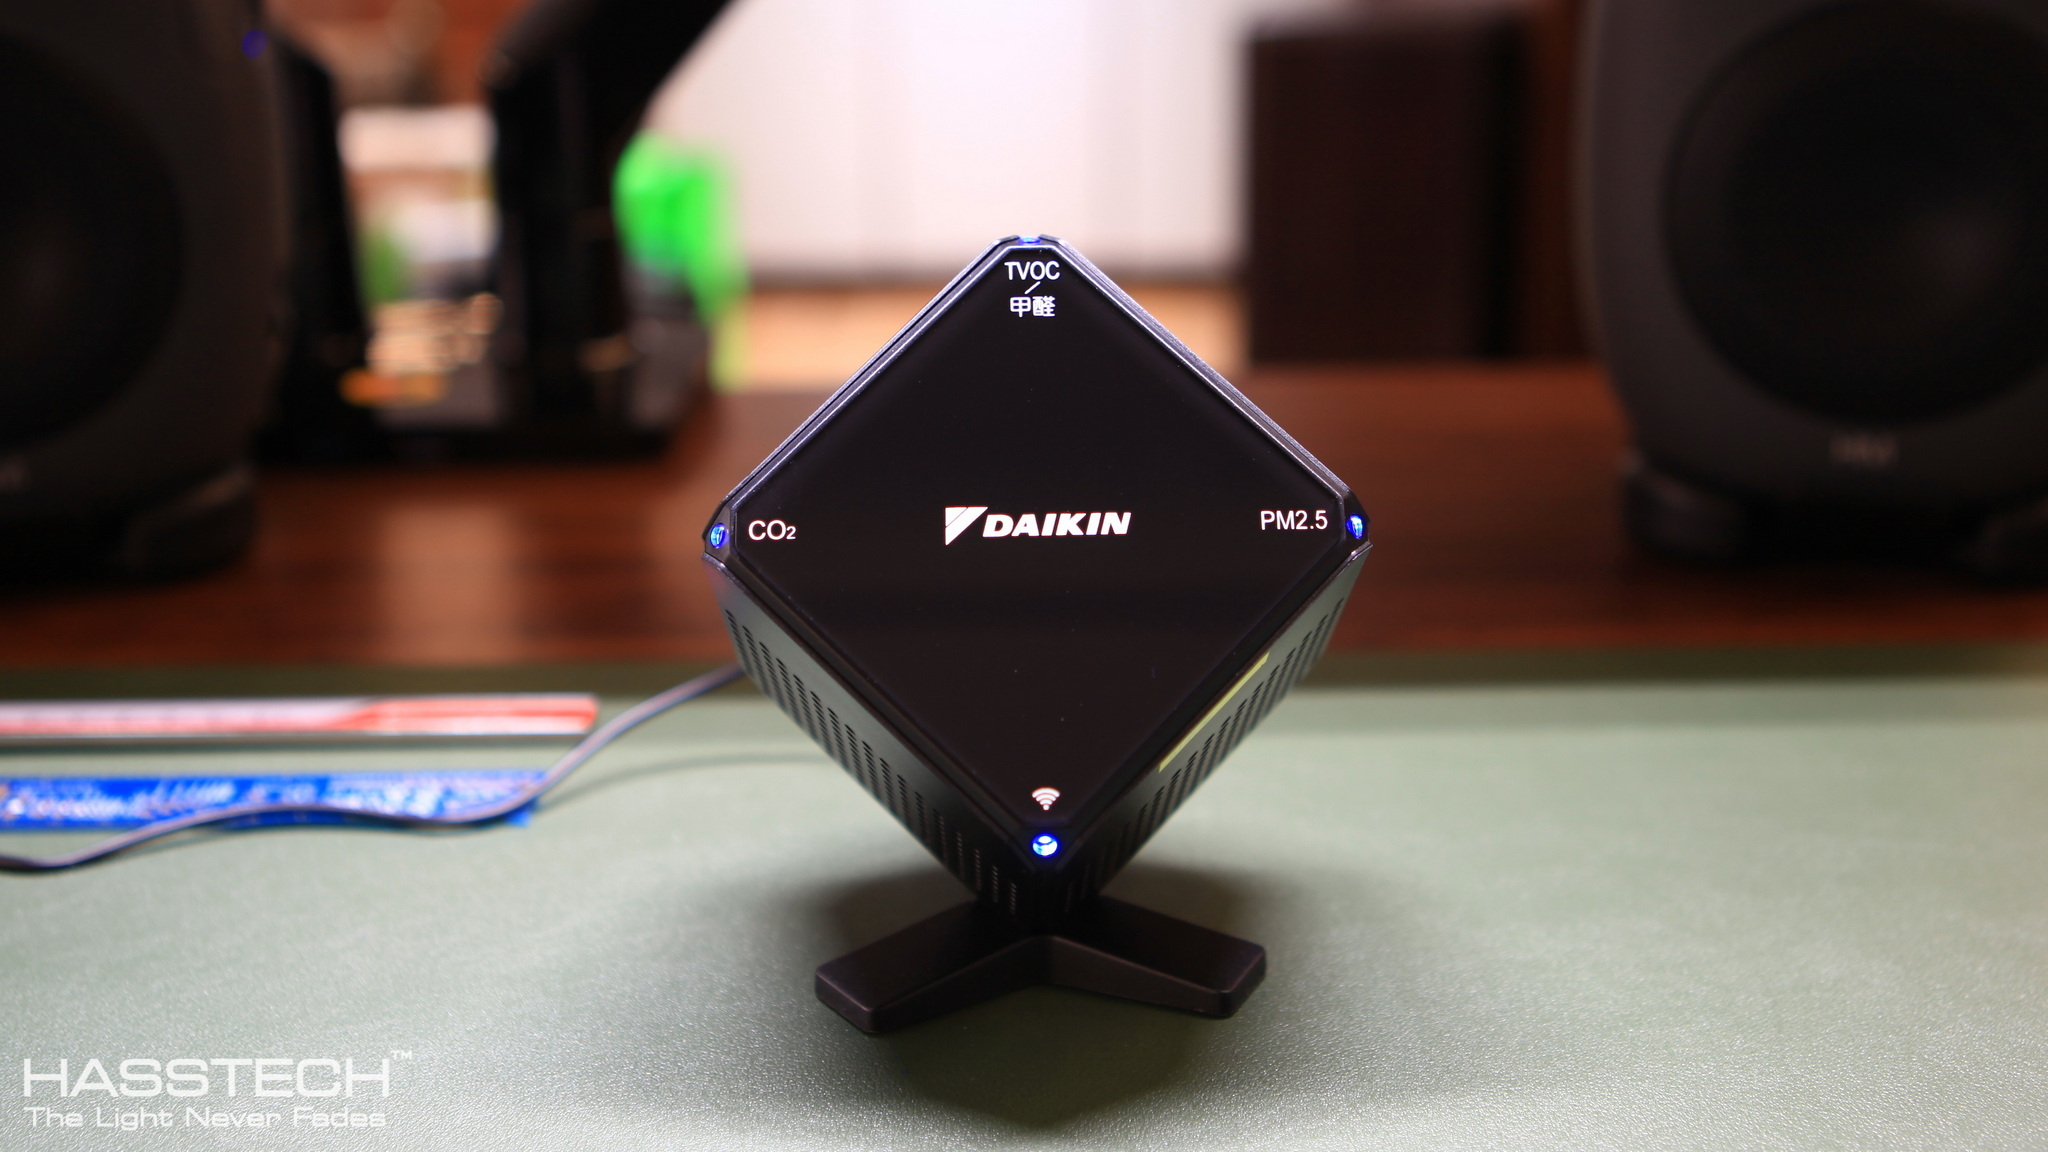
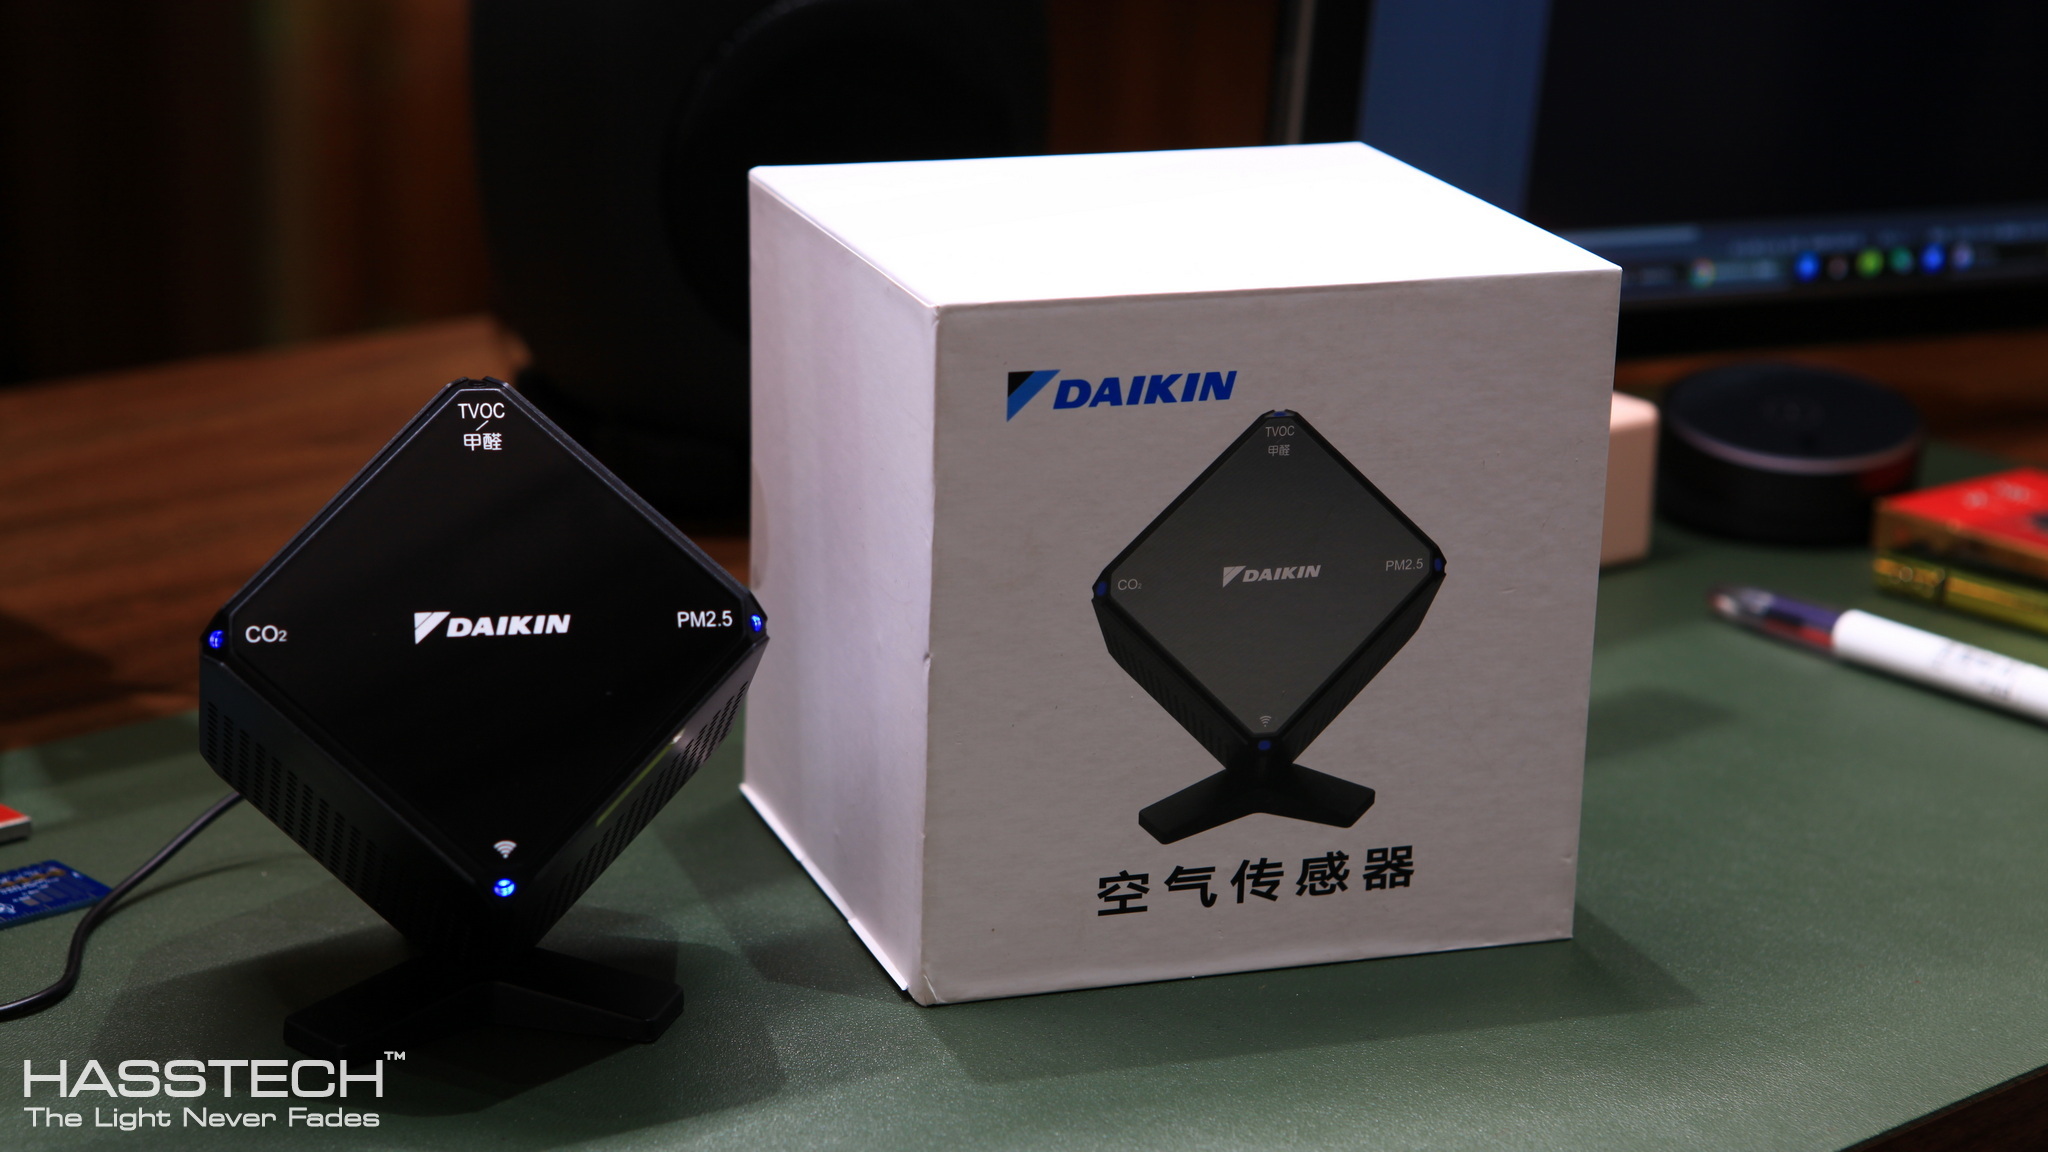
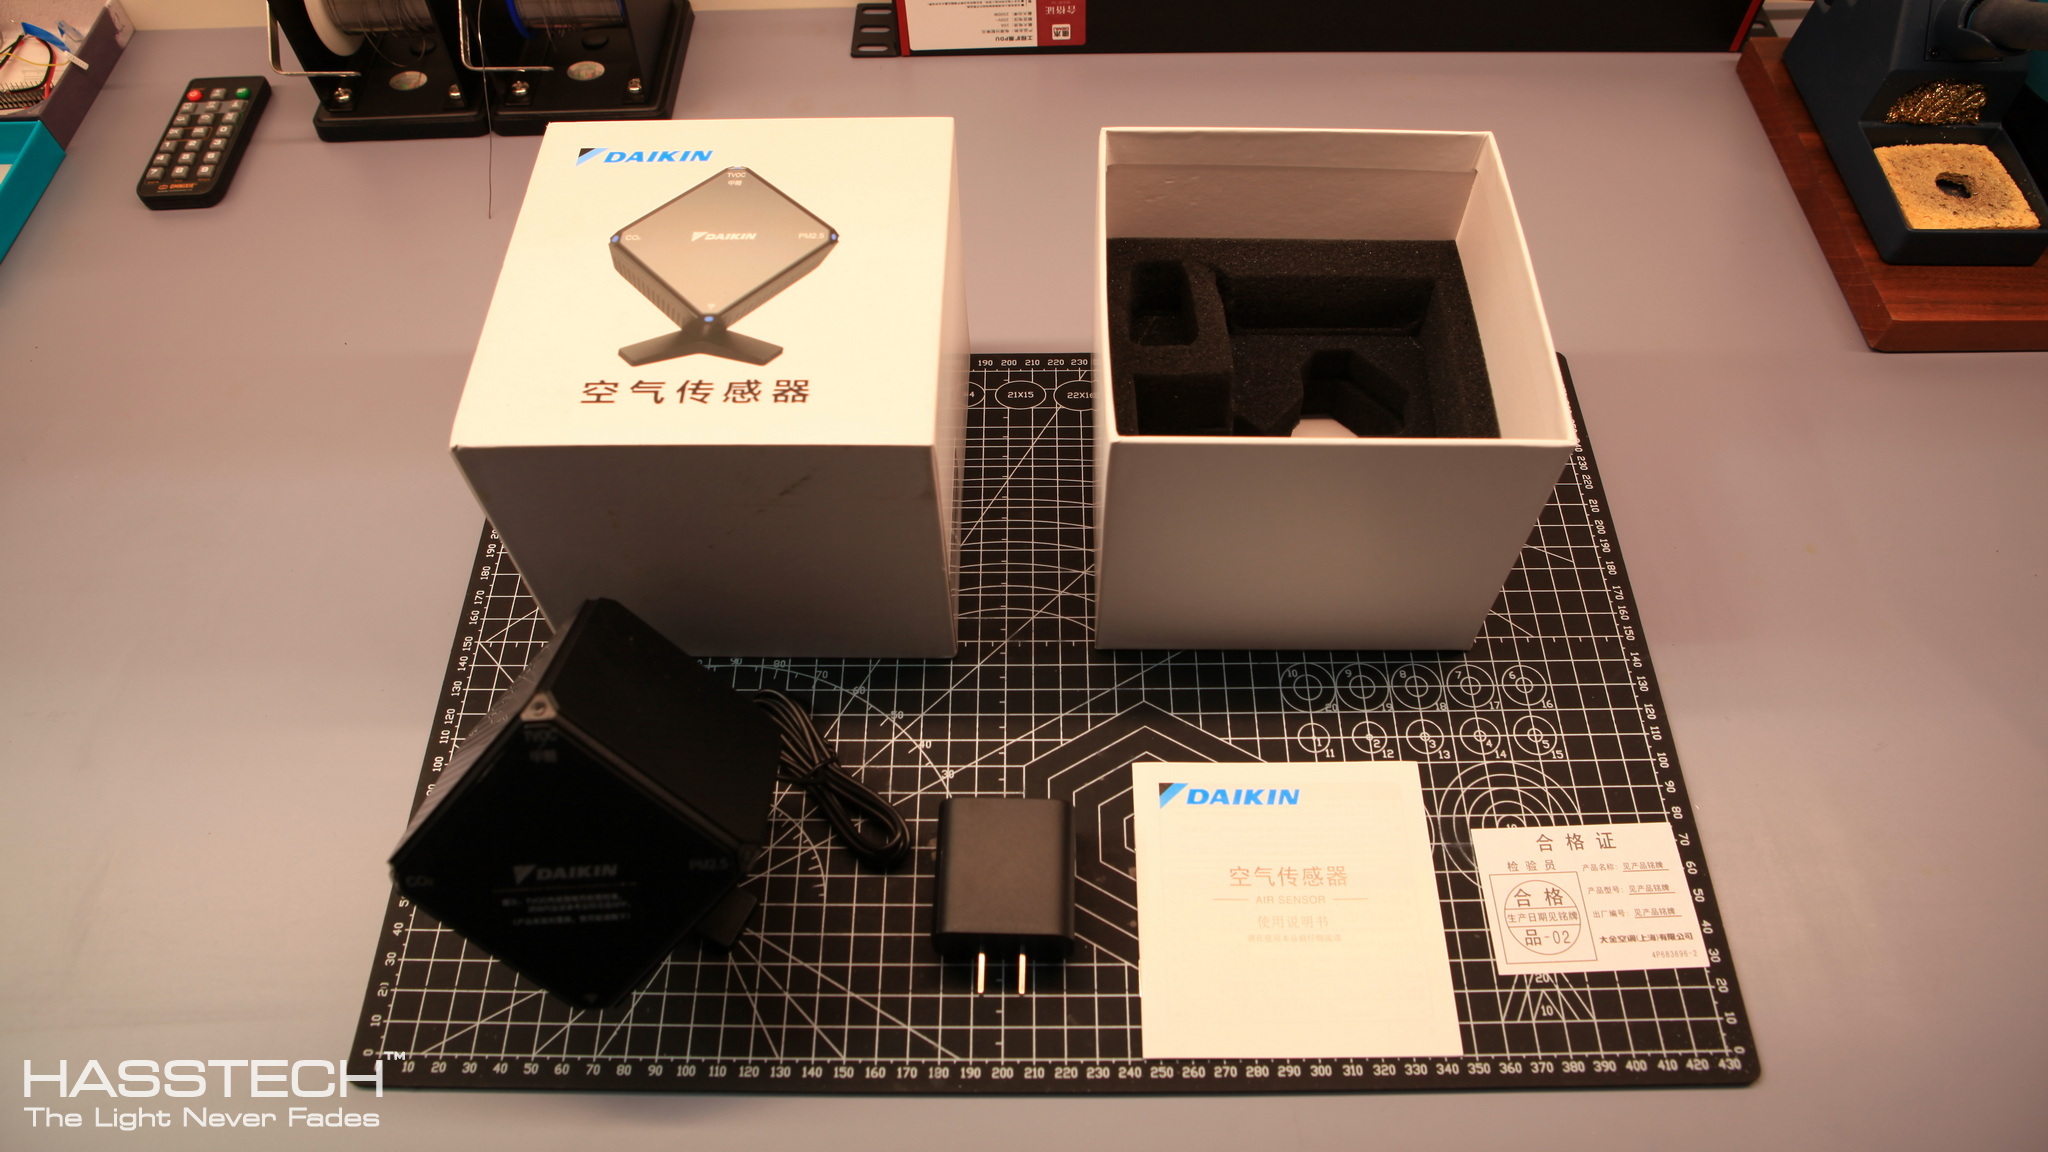
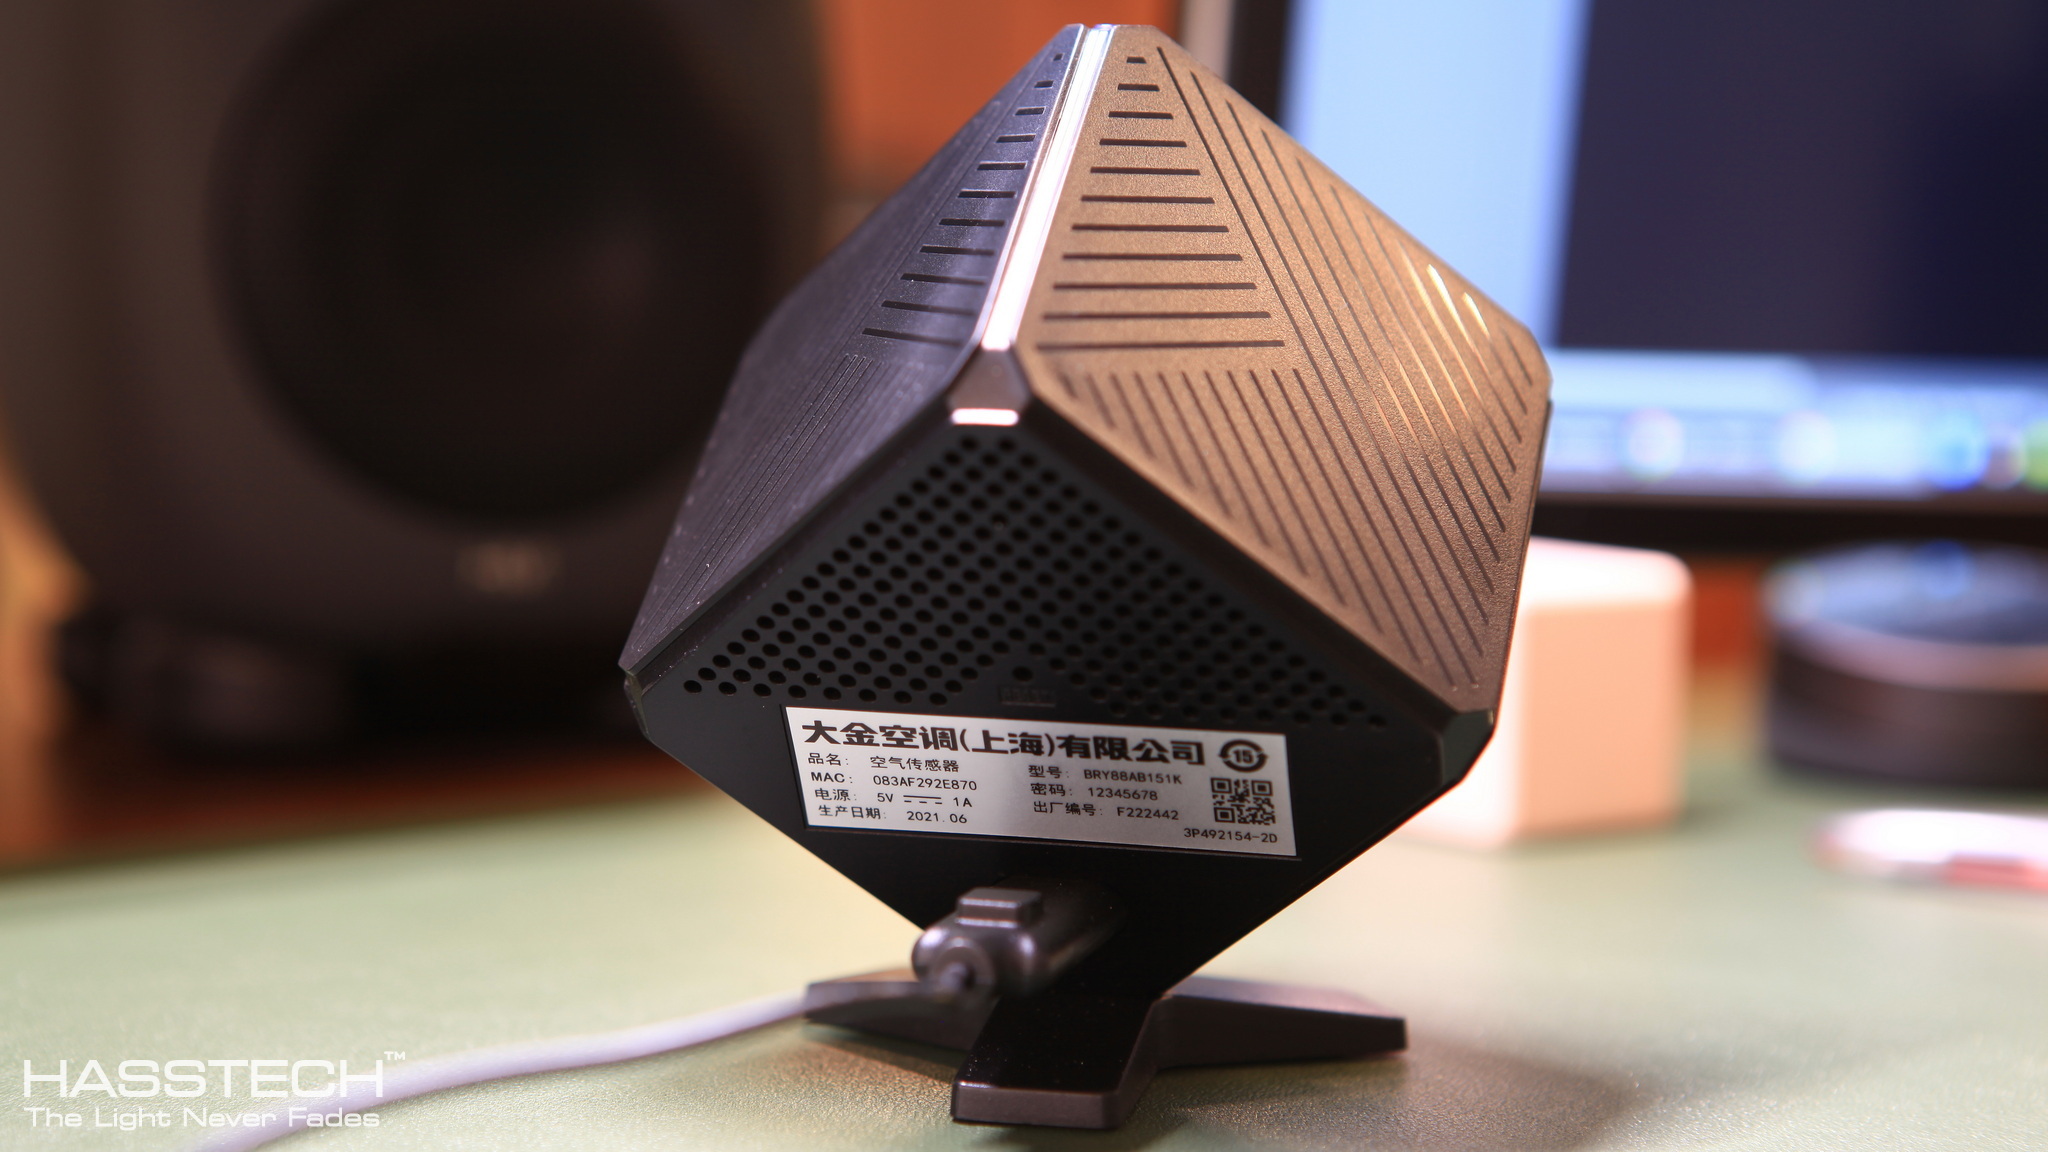
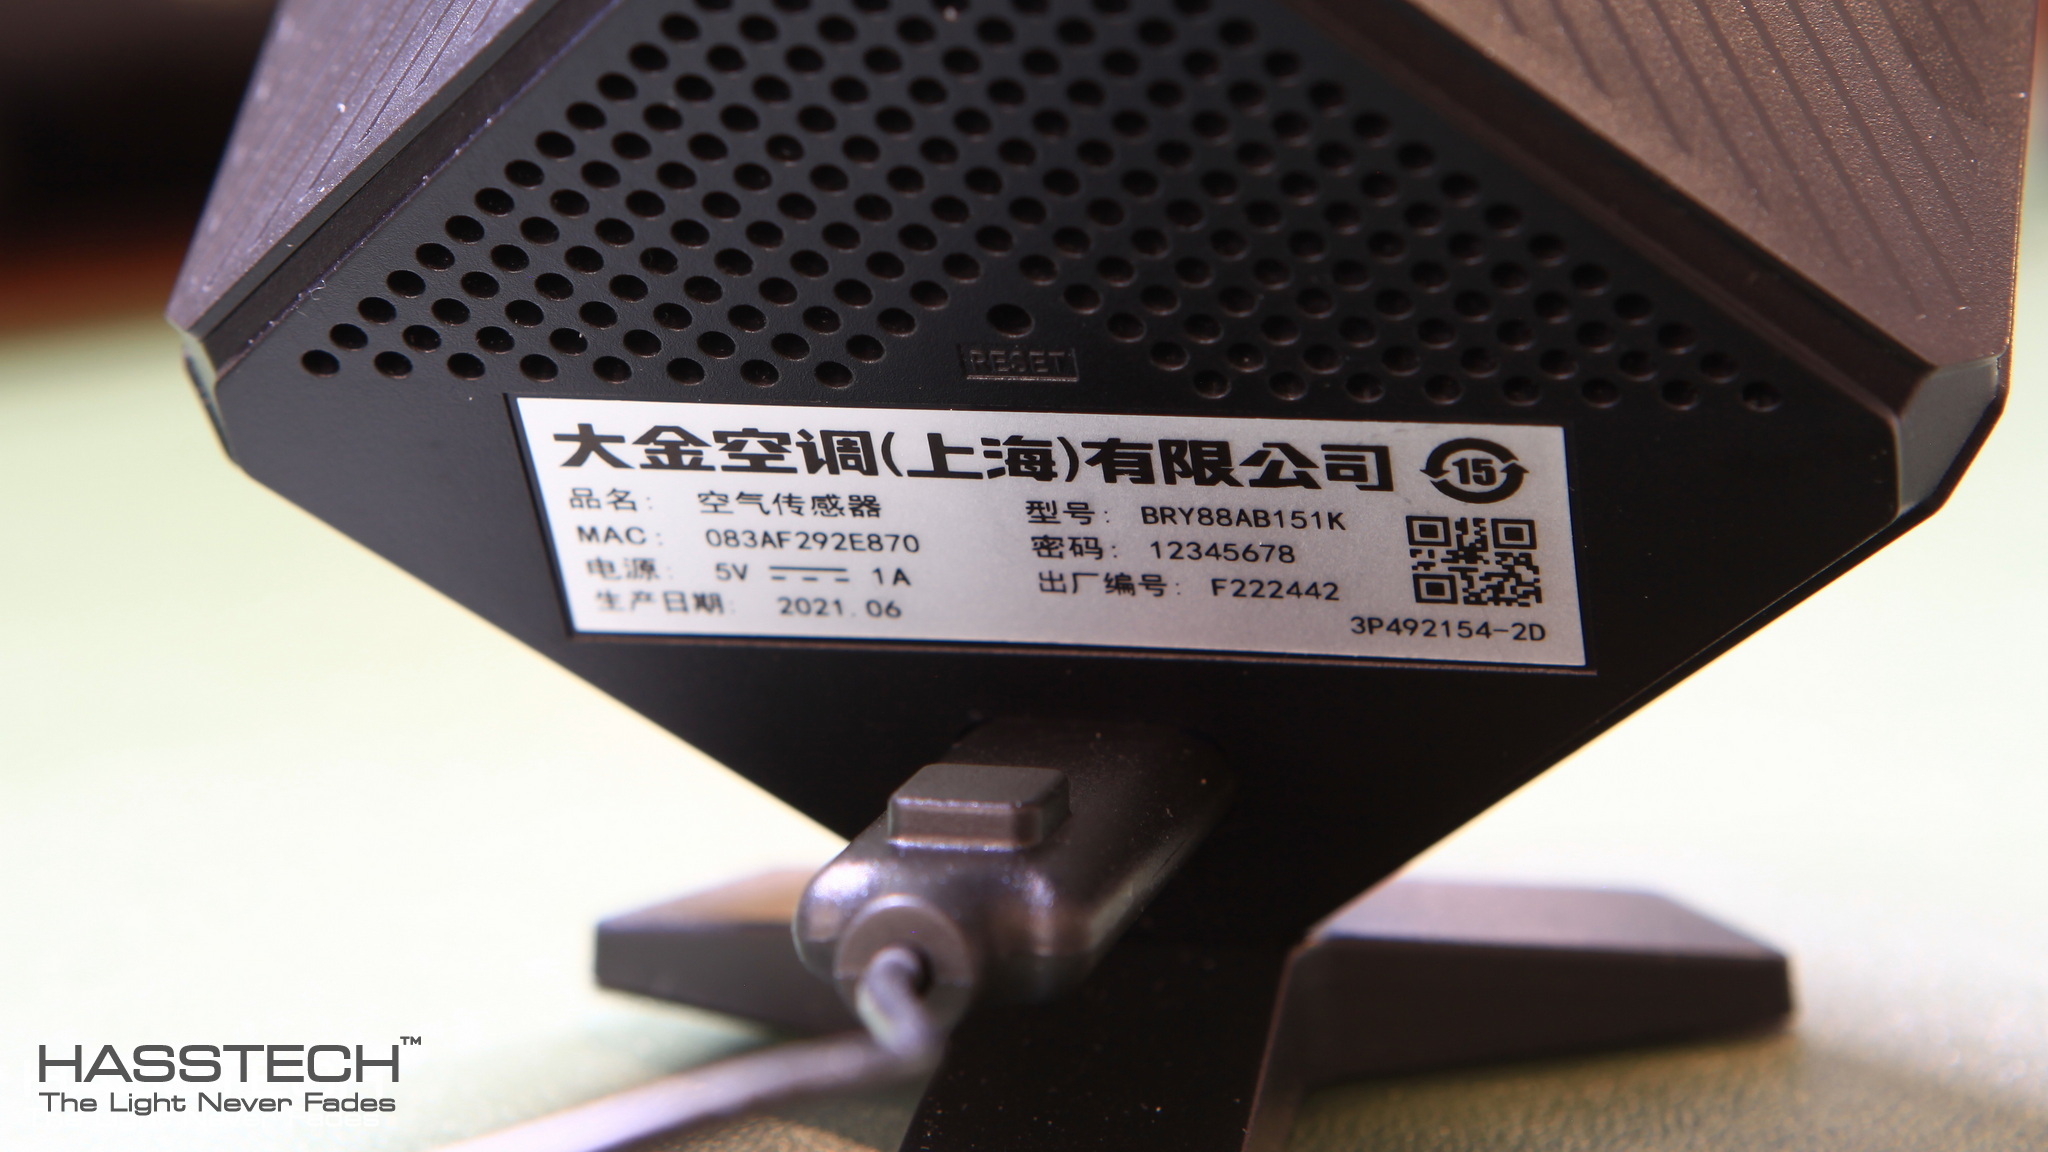
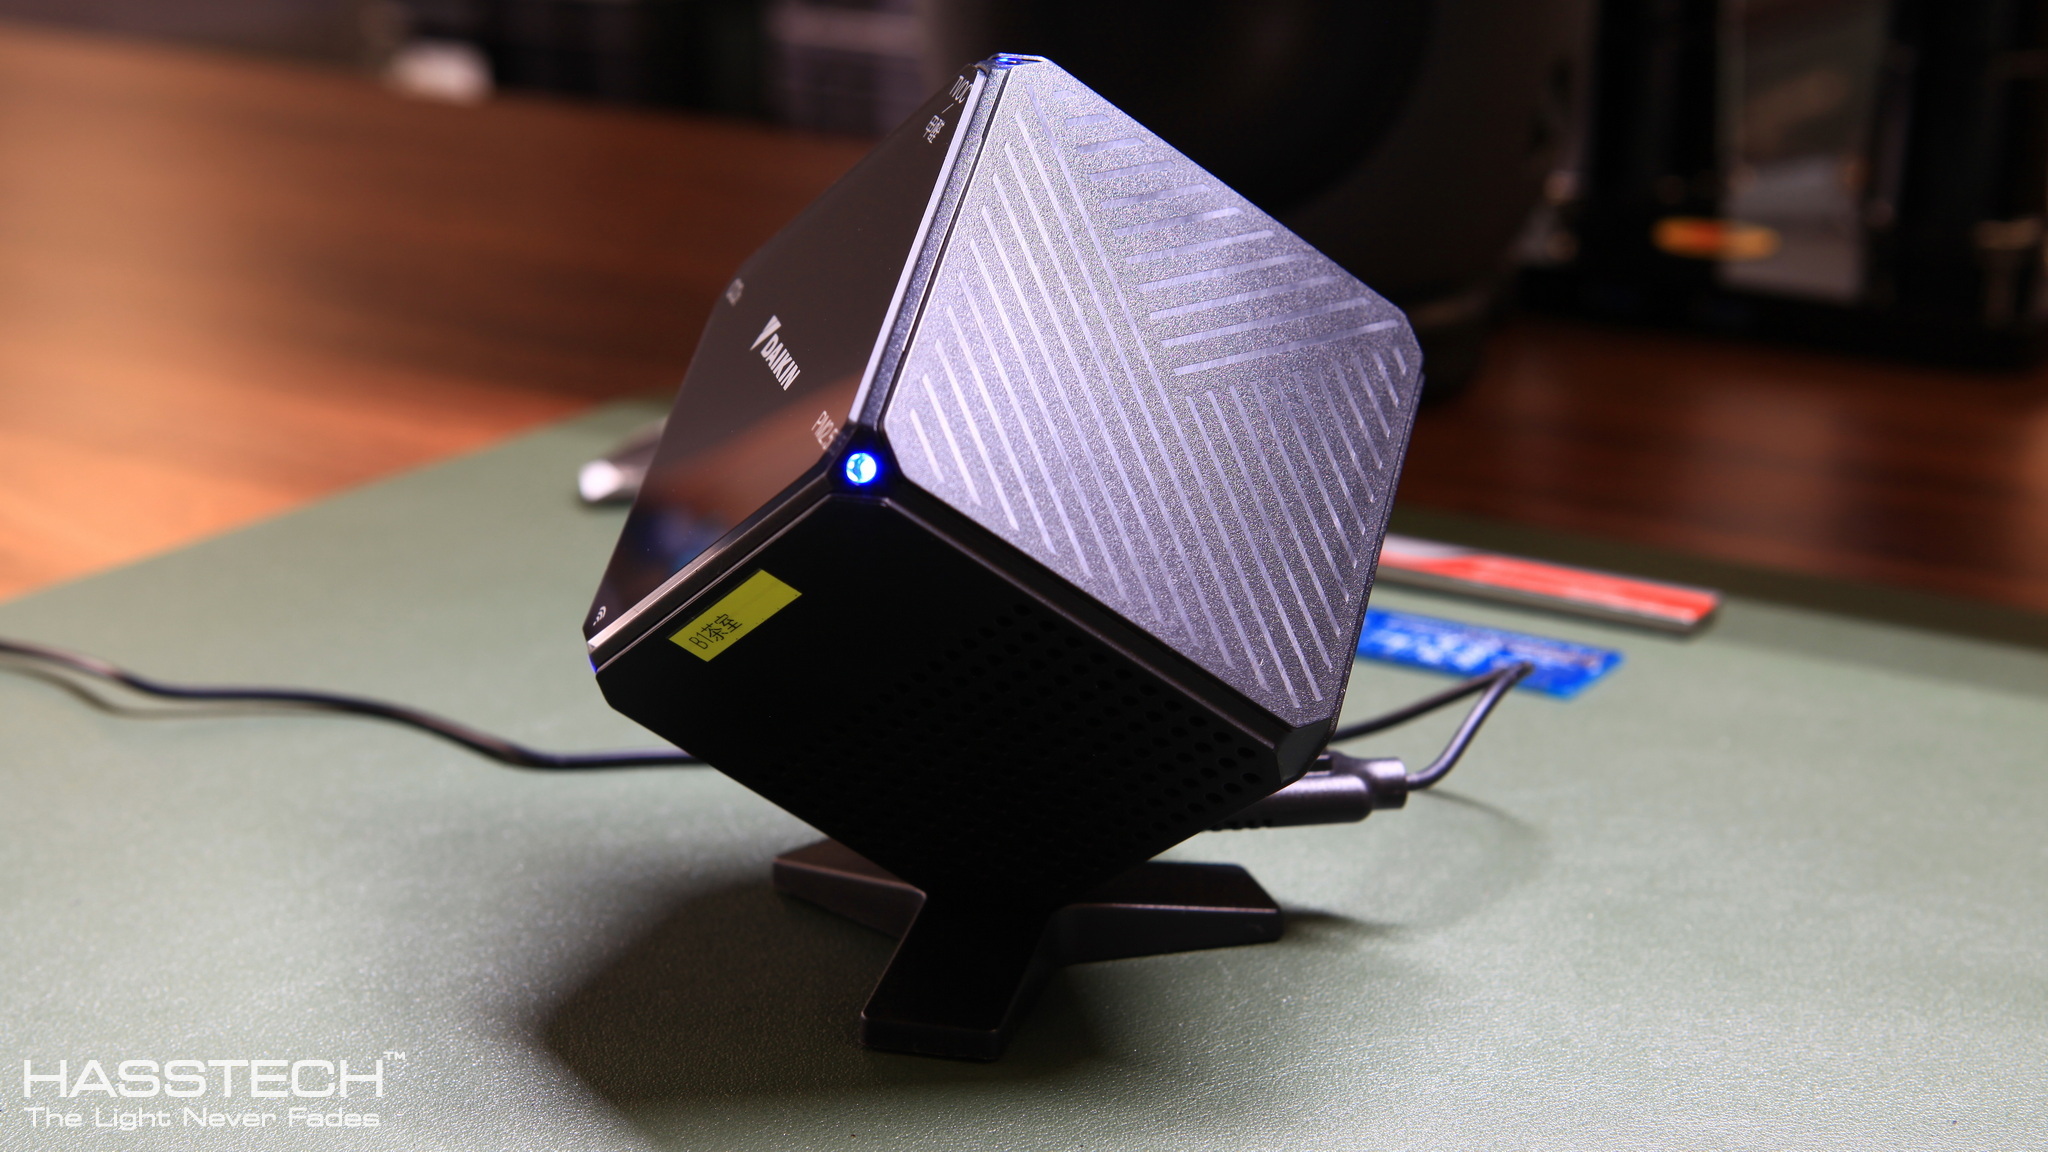
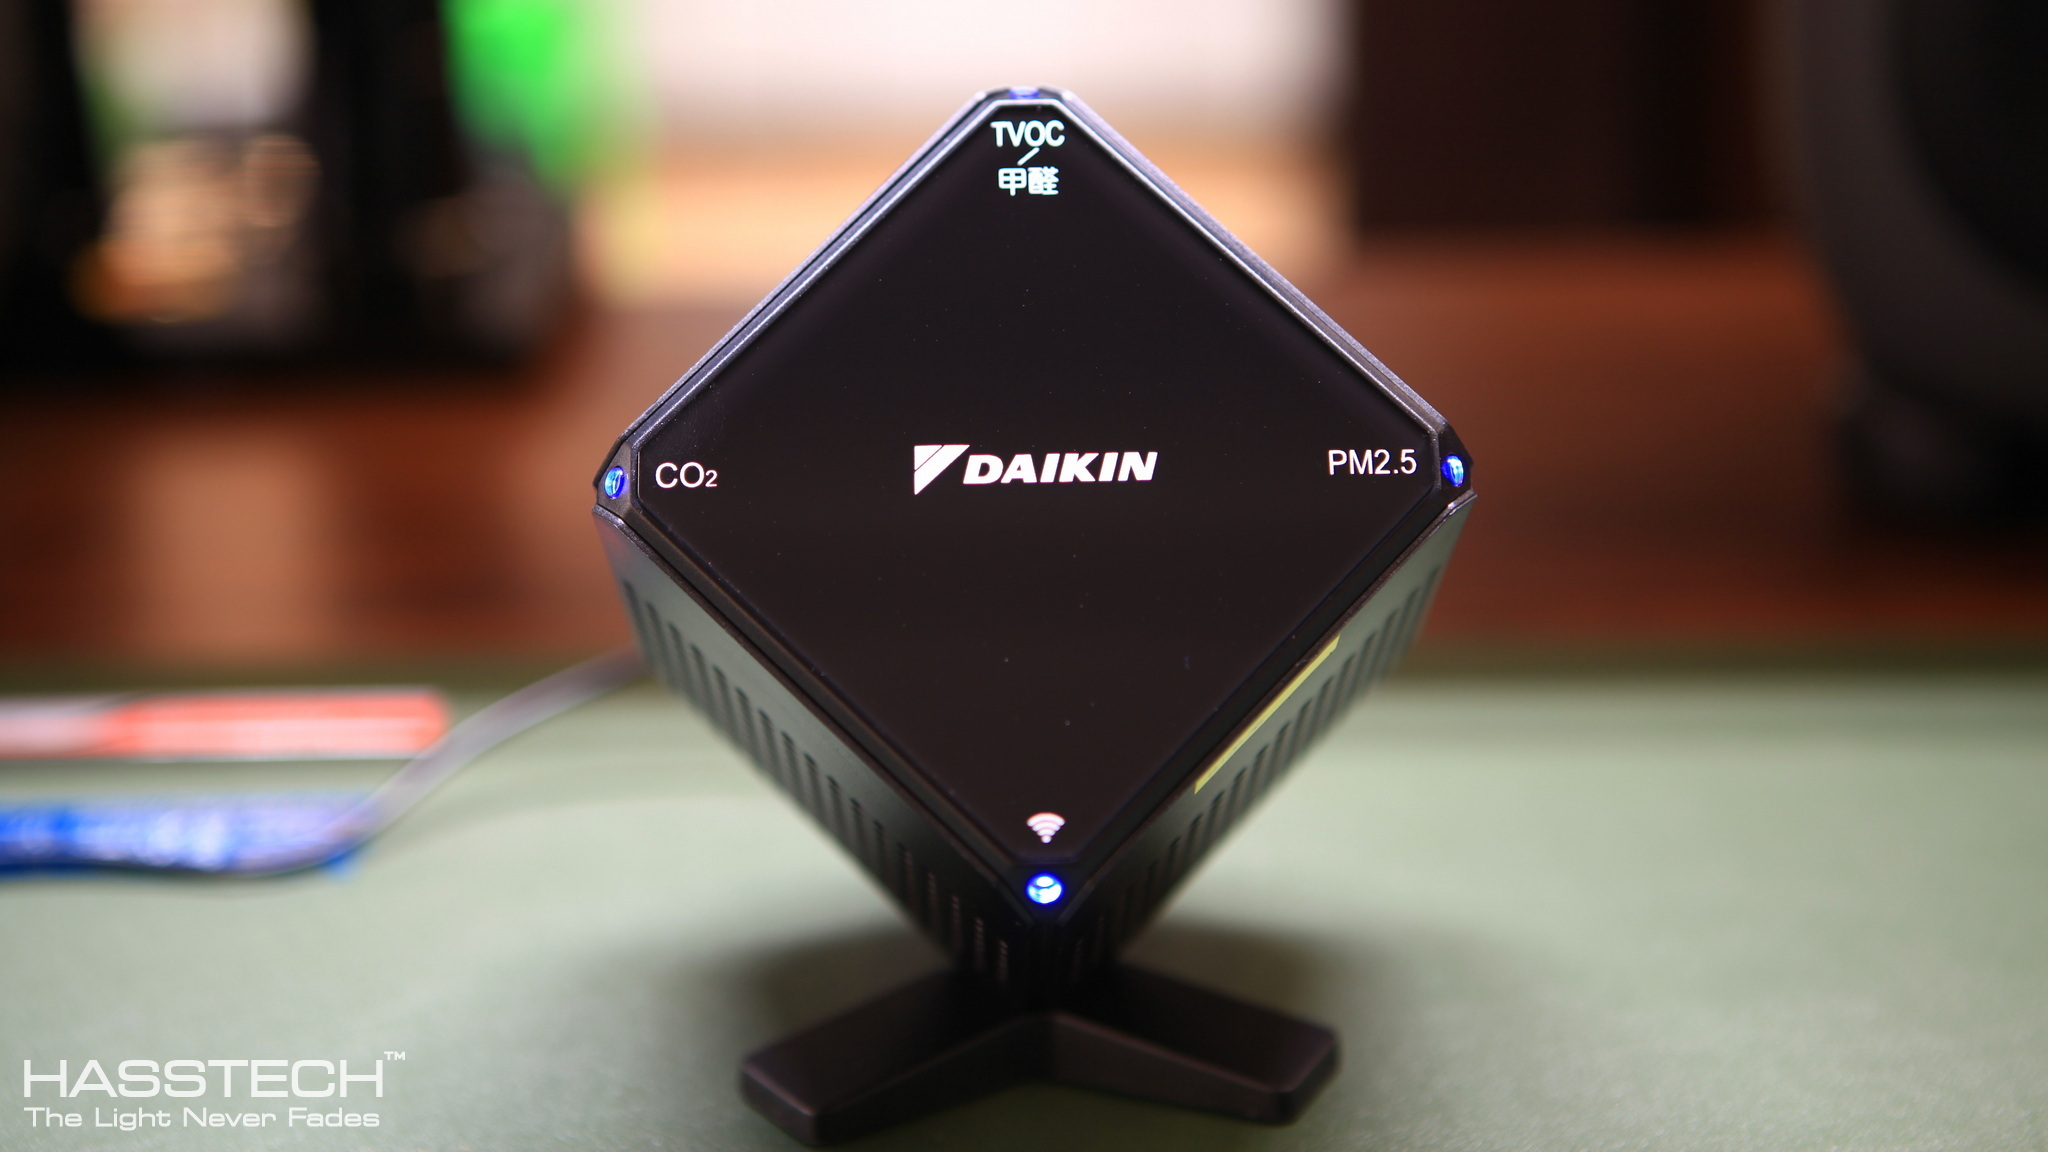
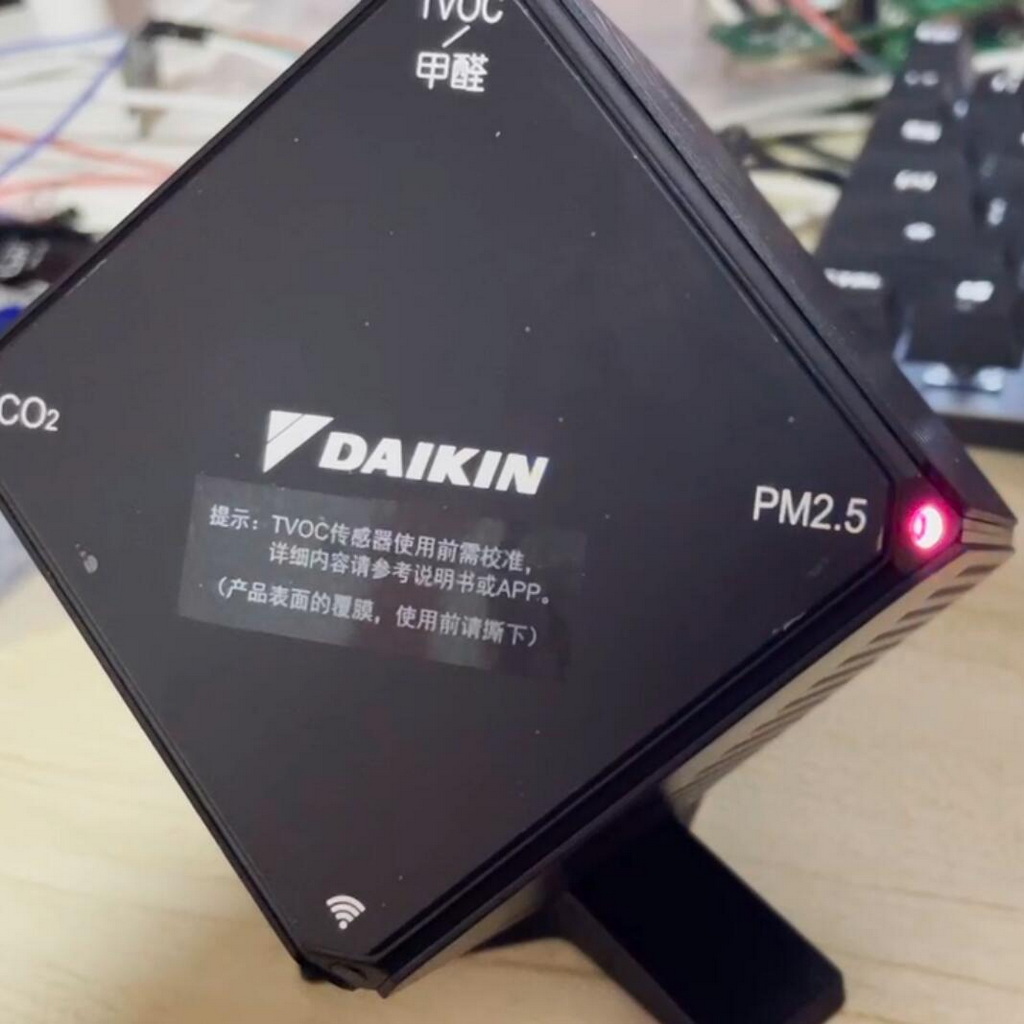
这款大金空气传感器的型号是BRY88AB151K(或者BRY88AA151K),属于大金空调(上海)有限公司生产制造。他的包装是一个近似于正方体的白色纸盒,打开包装后可以看到传感器主机、USB电源适配器、产品合格证和使用说明书,电源线是和传感器连为一体的。电源连接插头是一个标准的USB插头,电源适配器电压输入范围是AC100-240V – 50/60Hz,看来是全地球通用电压,输出是标准的USB DC5V – 1A。传感器本身也是一个正立方体的形状,通体黑色,只是底座固定在其中的一个棱角上,放置在桌面上时,仿佛是整个立方体的一个角嵌入桌面一样,比较独特。位于正面四个角上有四个LED指示灯,根据指示灯旁边的文字来判断应该是用来分别指示各个传感器的工作状态。传感器的尺寸为72mm x 72mm x 72mm,主机重量220g(包含电源和完整包装的重量为540g),外观细节请看下图:
The model of this Daikin air sensor is BRY88AB151K (or BRY88AA151K), which is manufactured by Daikin Air Conditioning (Shanghai) Co., Ltd. The packaging is a white carton that is similar to a cube. After opening the package, you can see the sensor, USB power adapter, product certification, and instruction manual. The power cable is connected with the sensor. The power plug is a standard USB plug, the input voltage range of the power adapter is AC100-240V – 50/60Hz, which seems to be the universal voltage, and the output is the standard USB DC5V – 1A. The sensor is also in the shape of a regular cube, the whole body is black, but the base is fixed on one of the corners. When placed on the desktop, it seems that a corner of the whole cube is embedded in the desktop, which is quite unique. There are four LED indicator lights on the four corners of the front panel, judging from the text next to the indicator lights, they should be used to indicate the working status of each sensor respectively. The size of the sensor is 72mm x 72mm x 72mm, and the weight of the sensor is 220g (540g including the power supply and the complete package). Please check below for the appearance details:


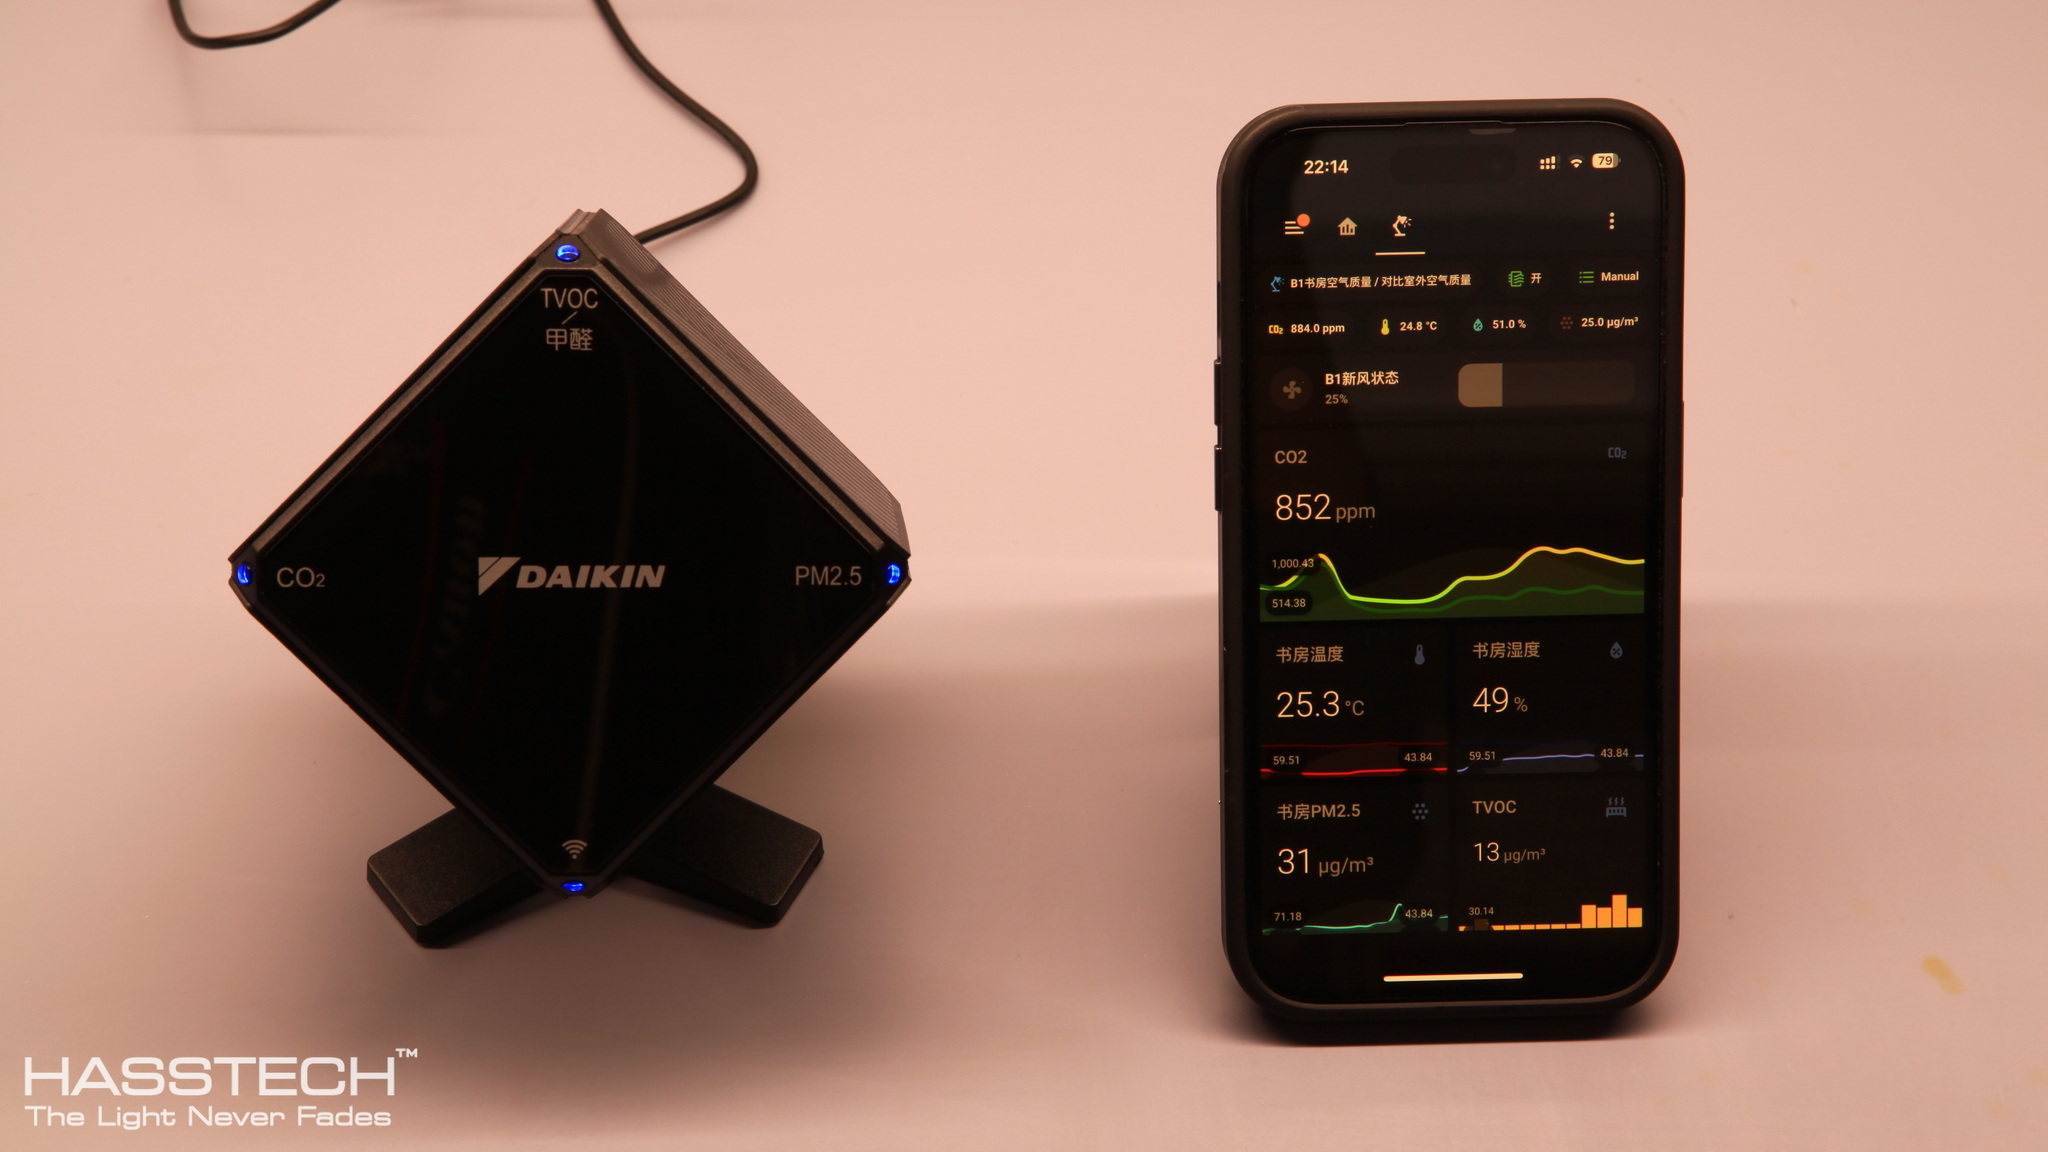
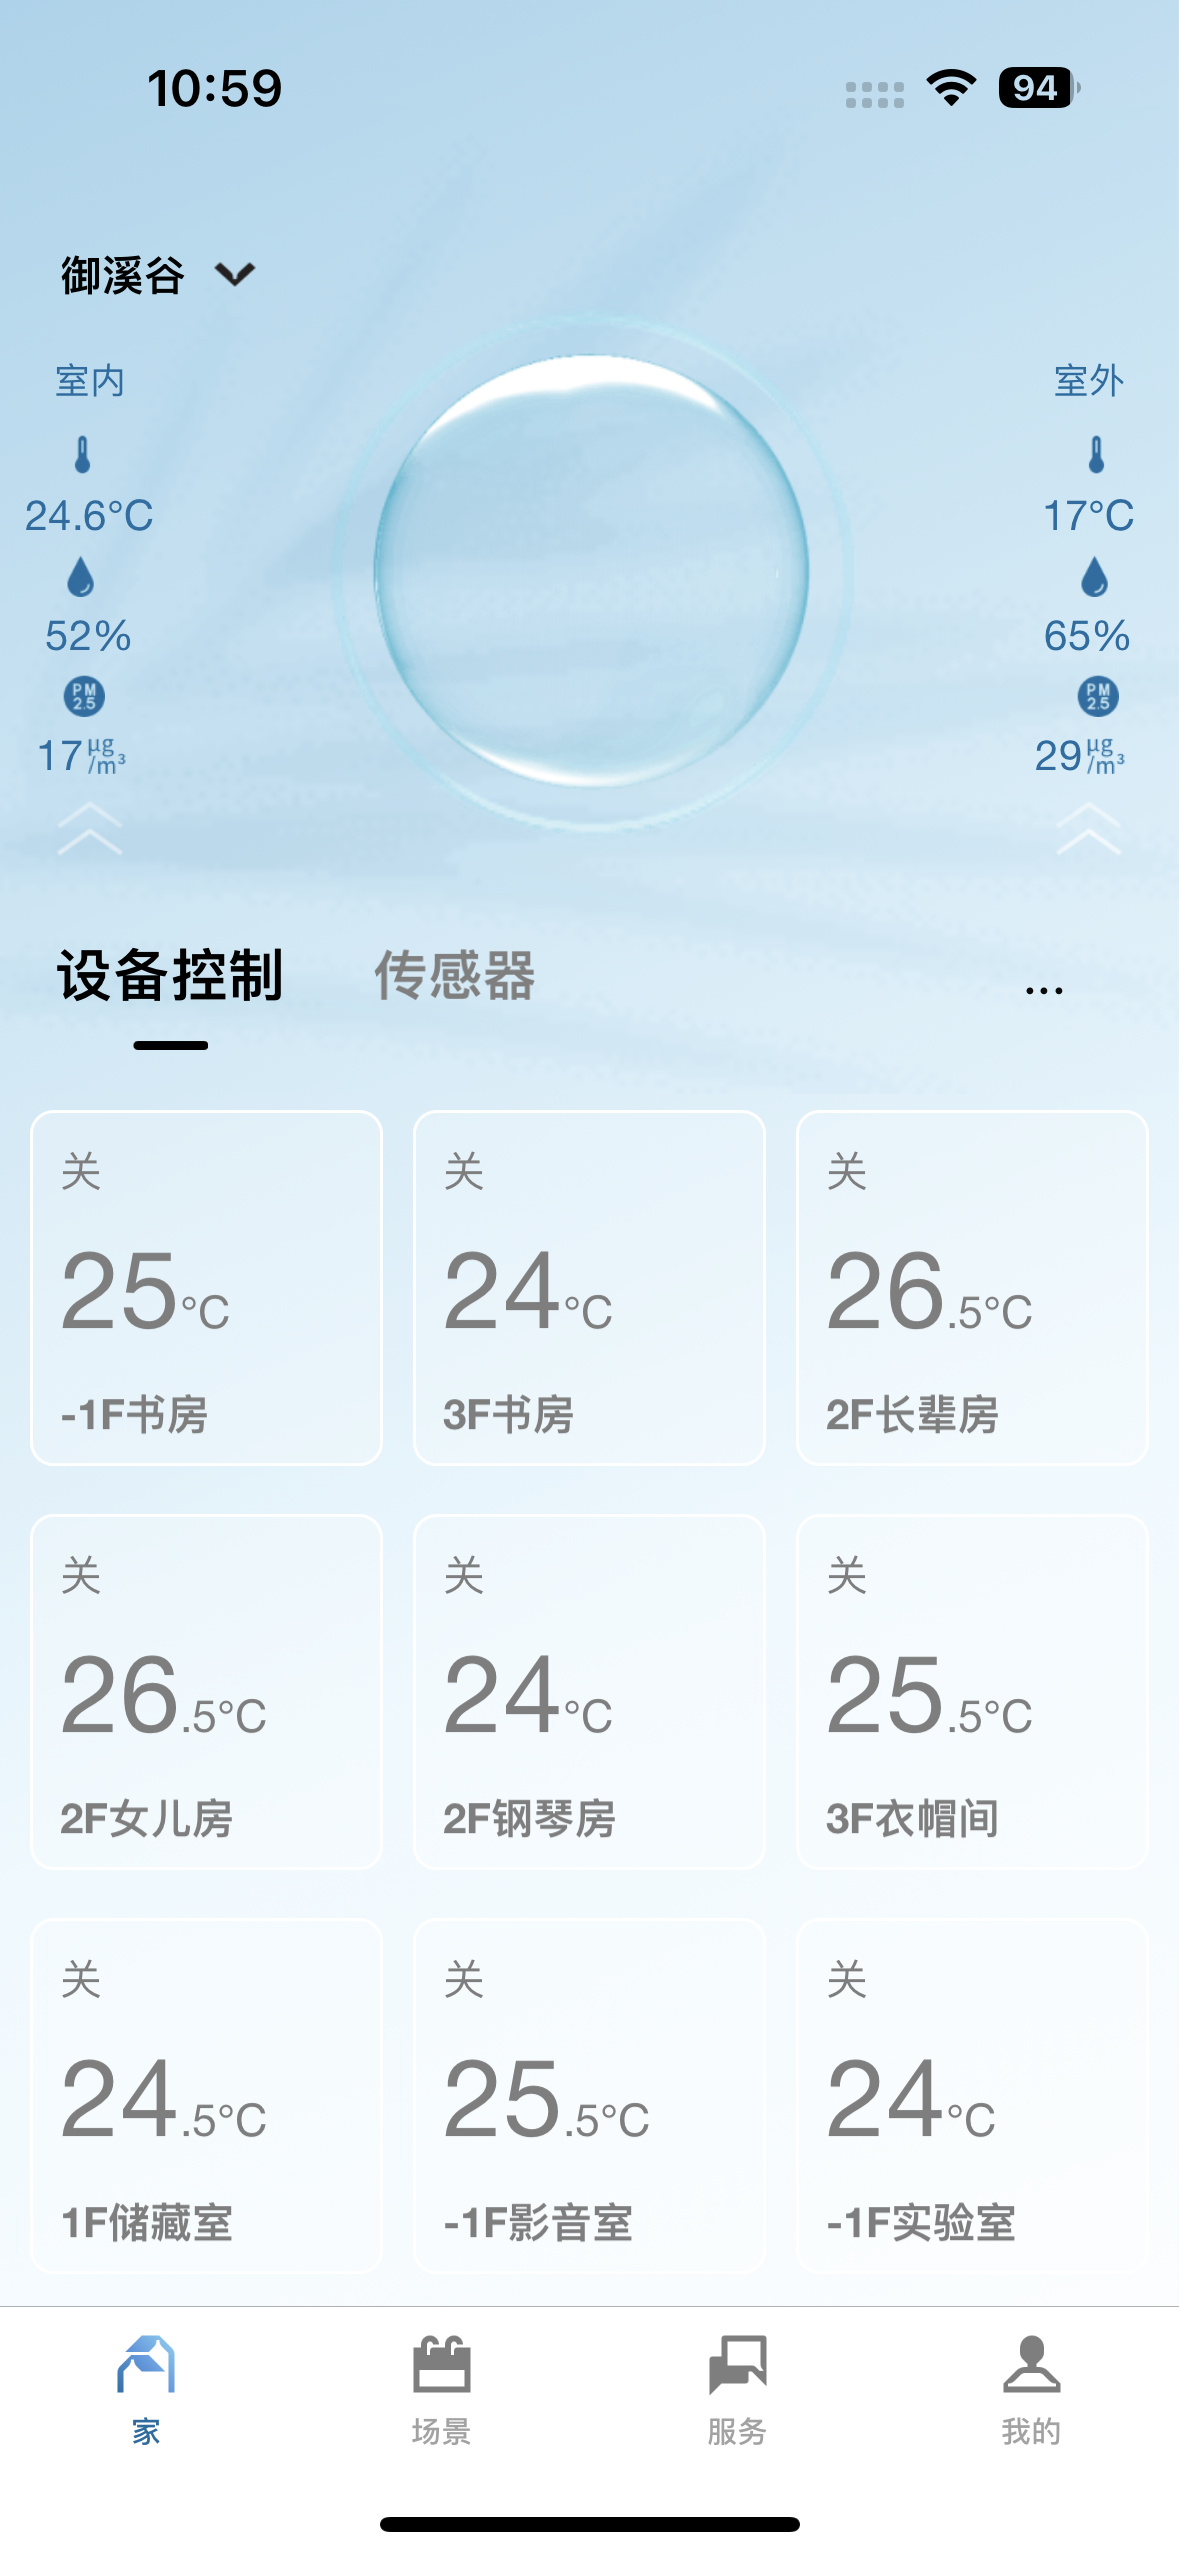
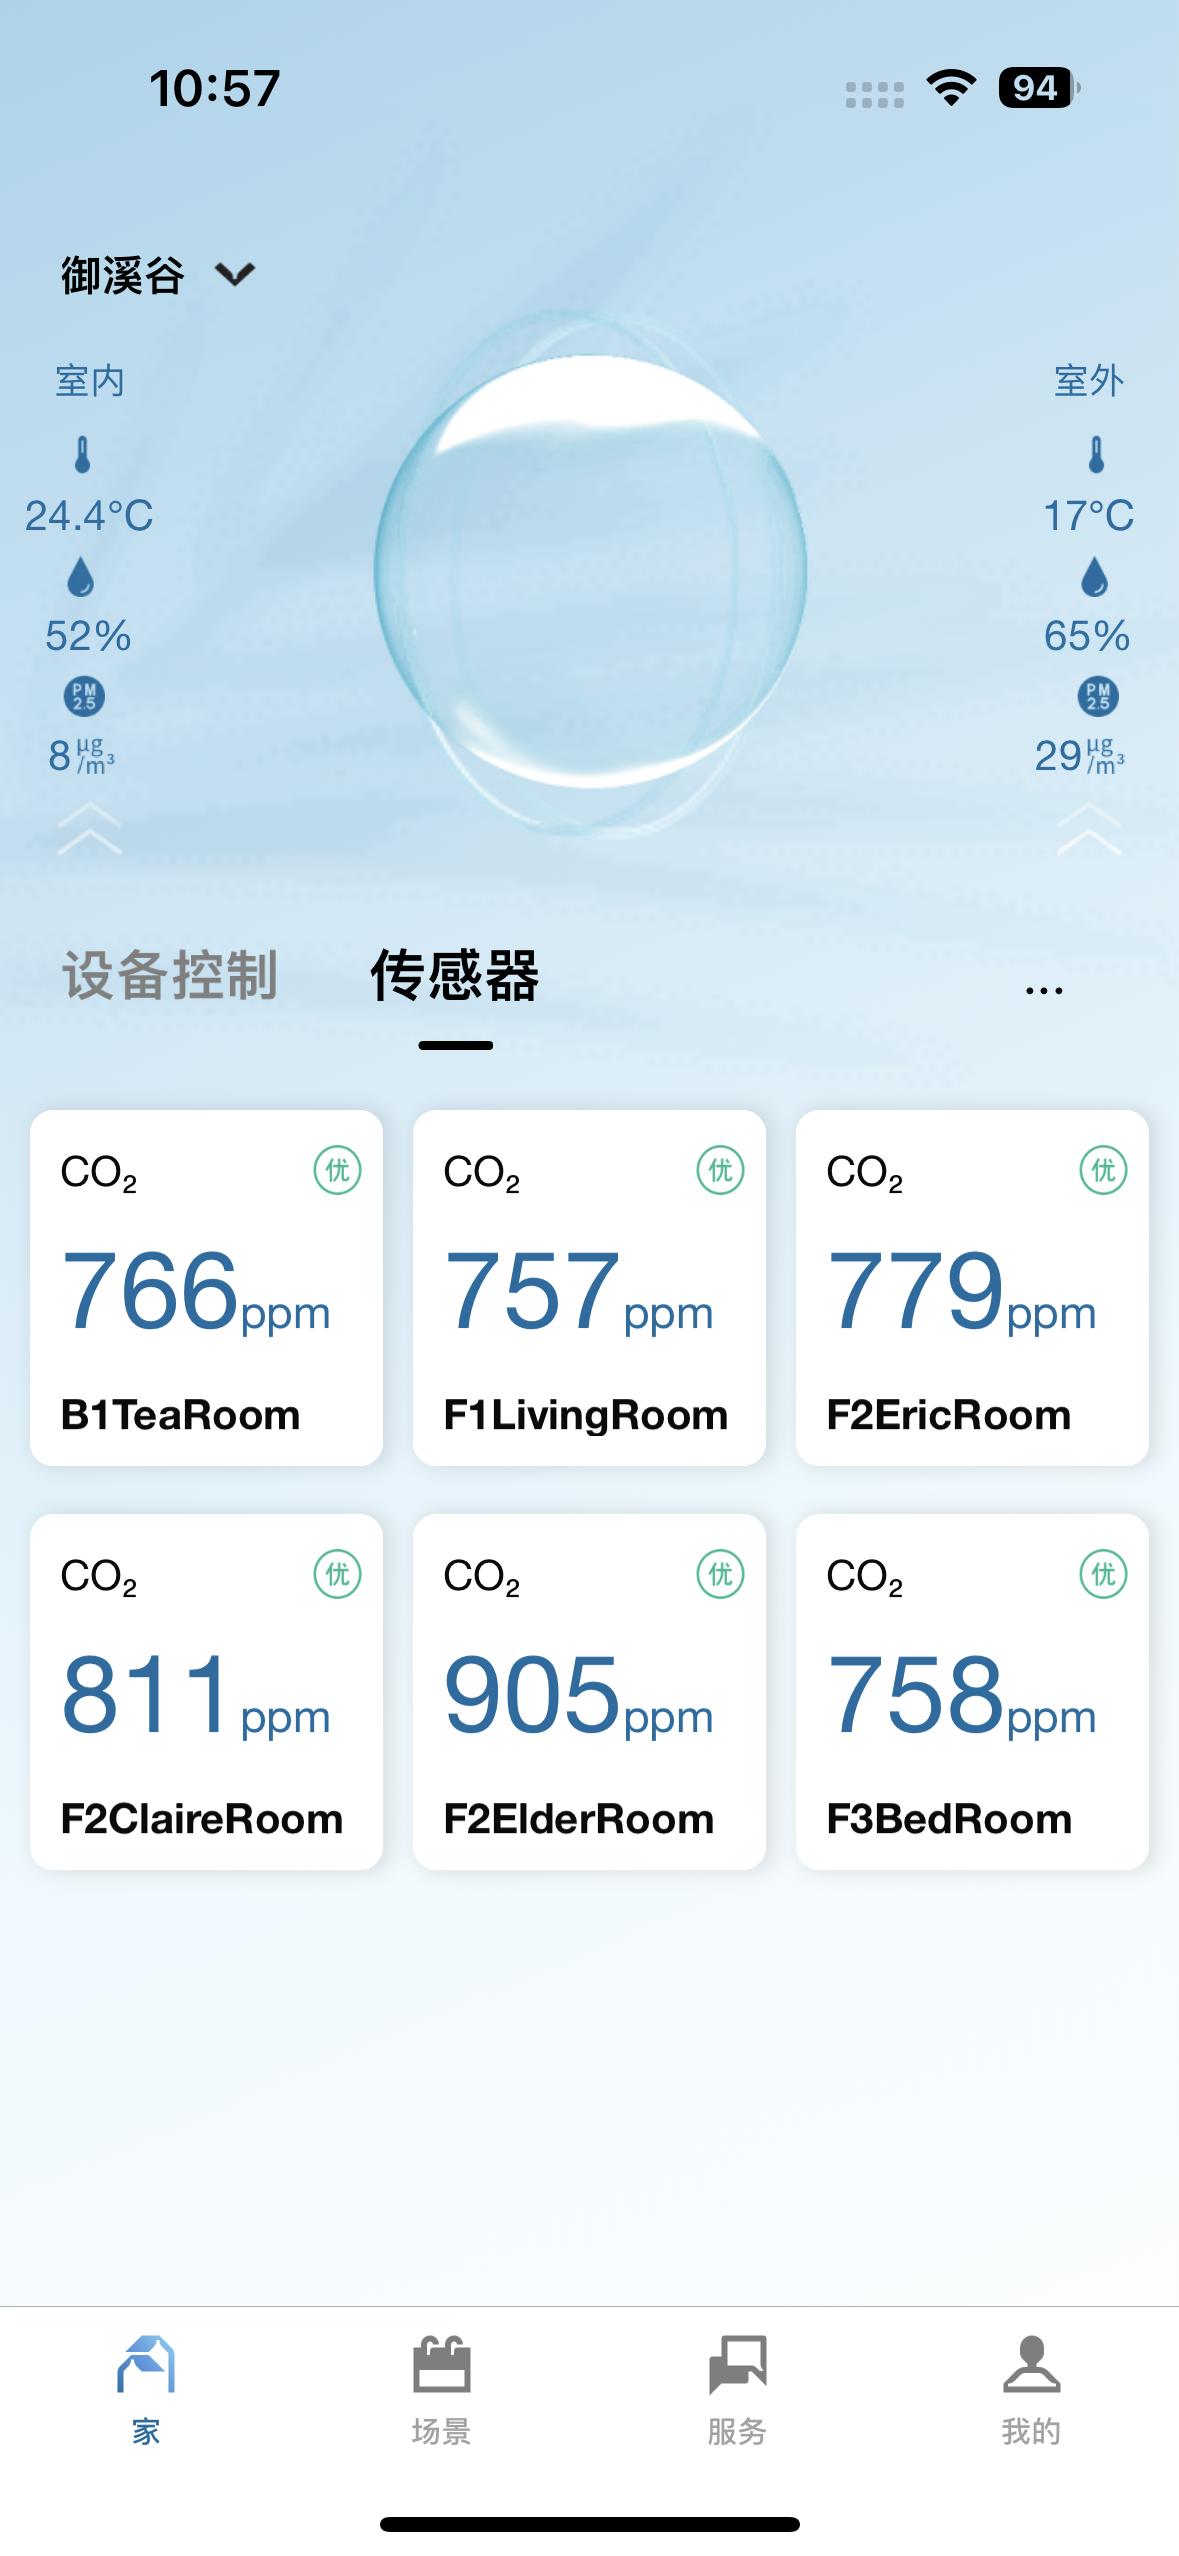
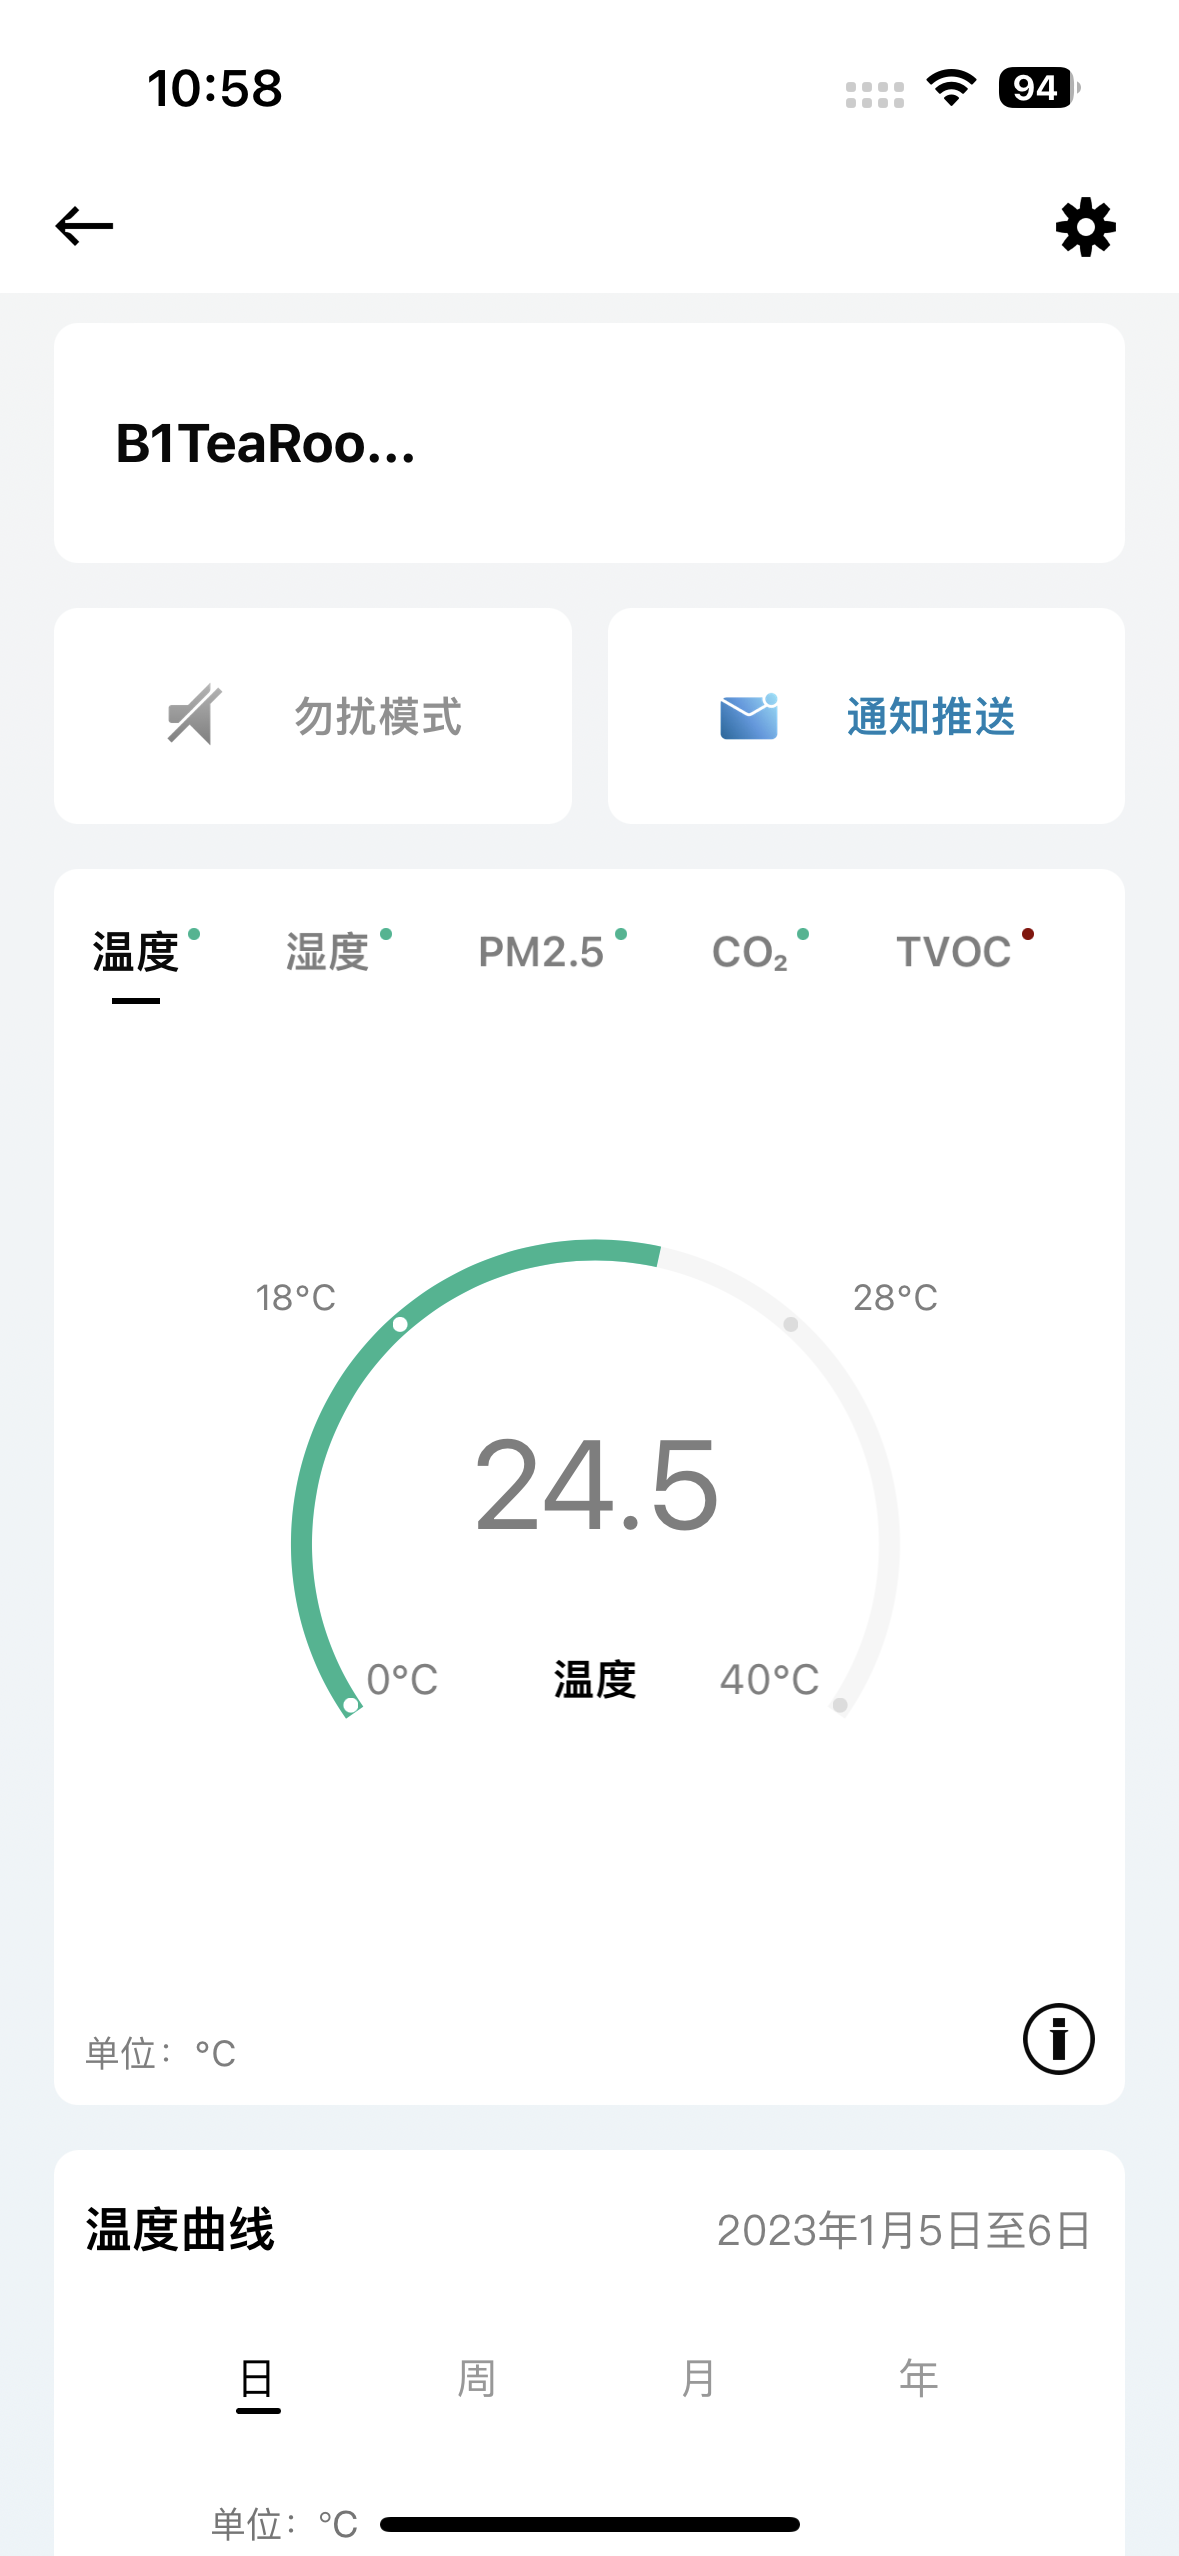
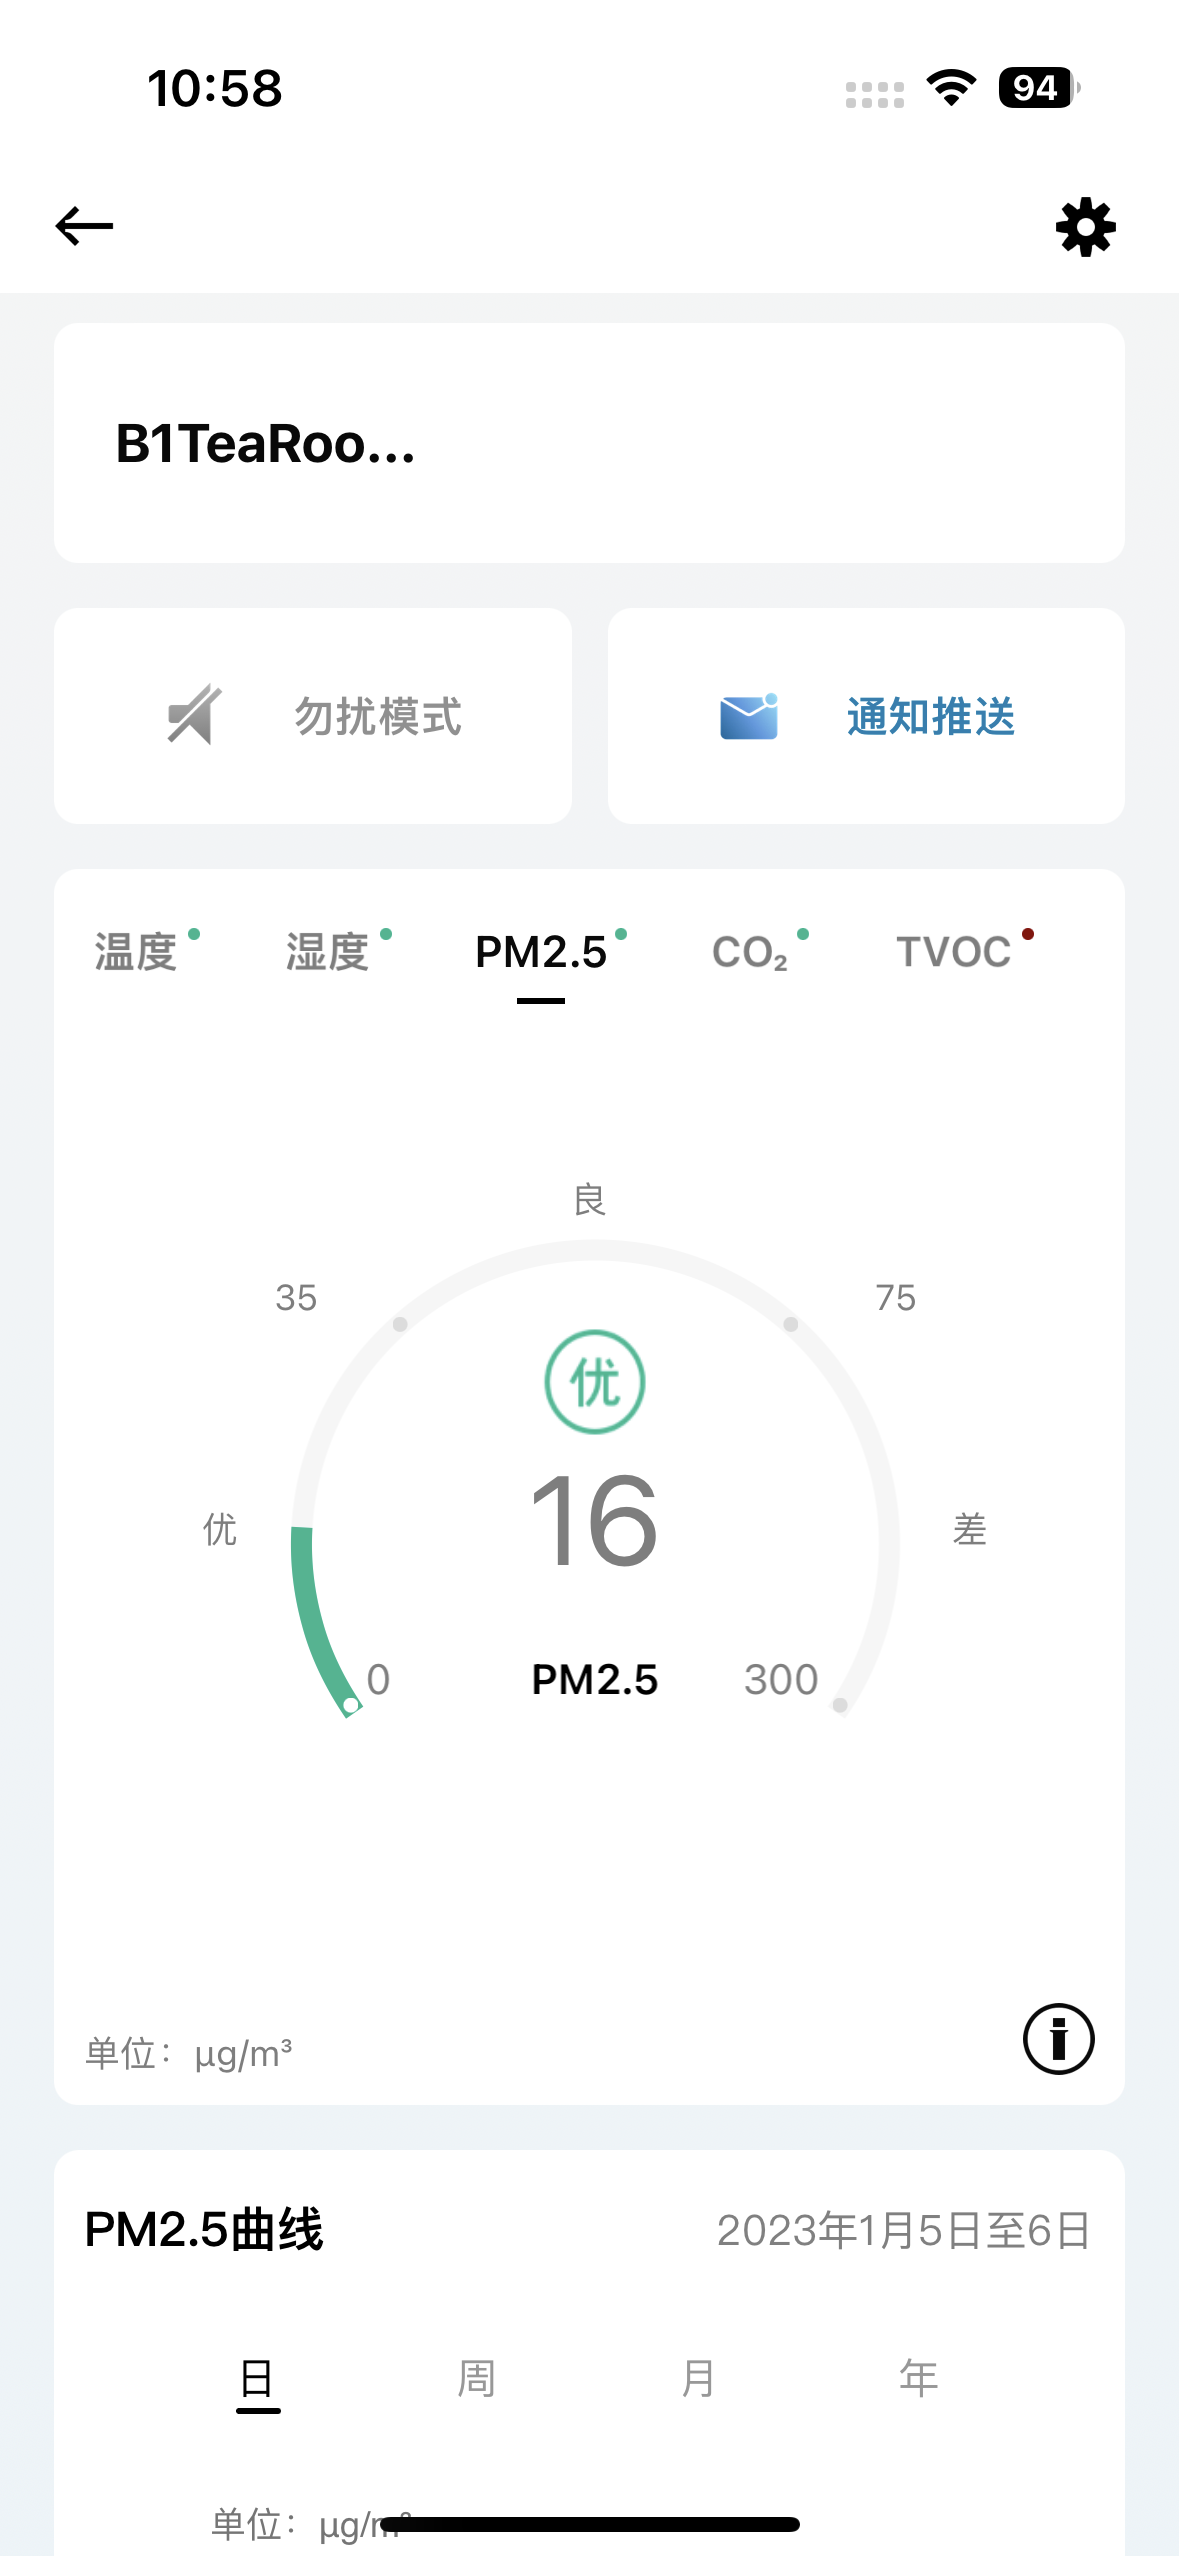
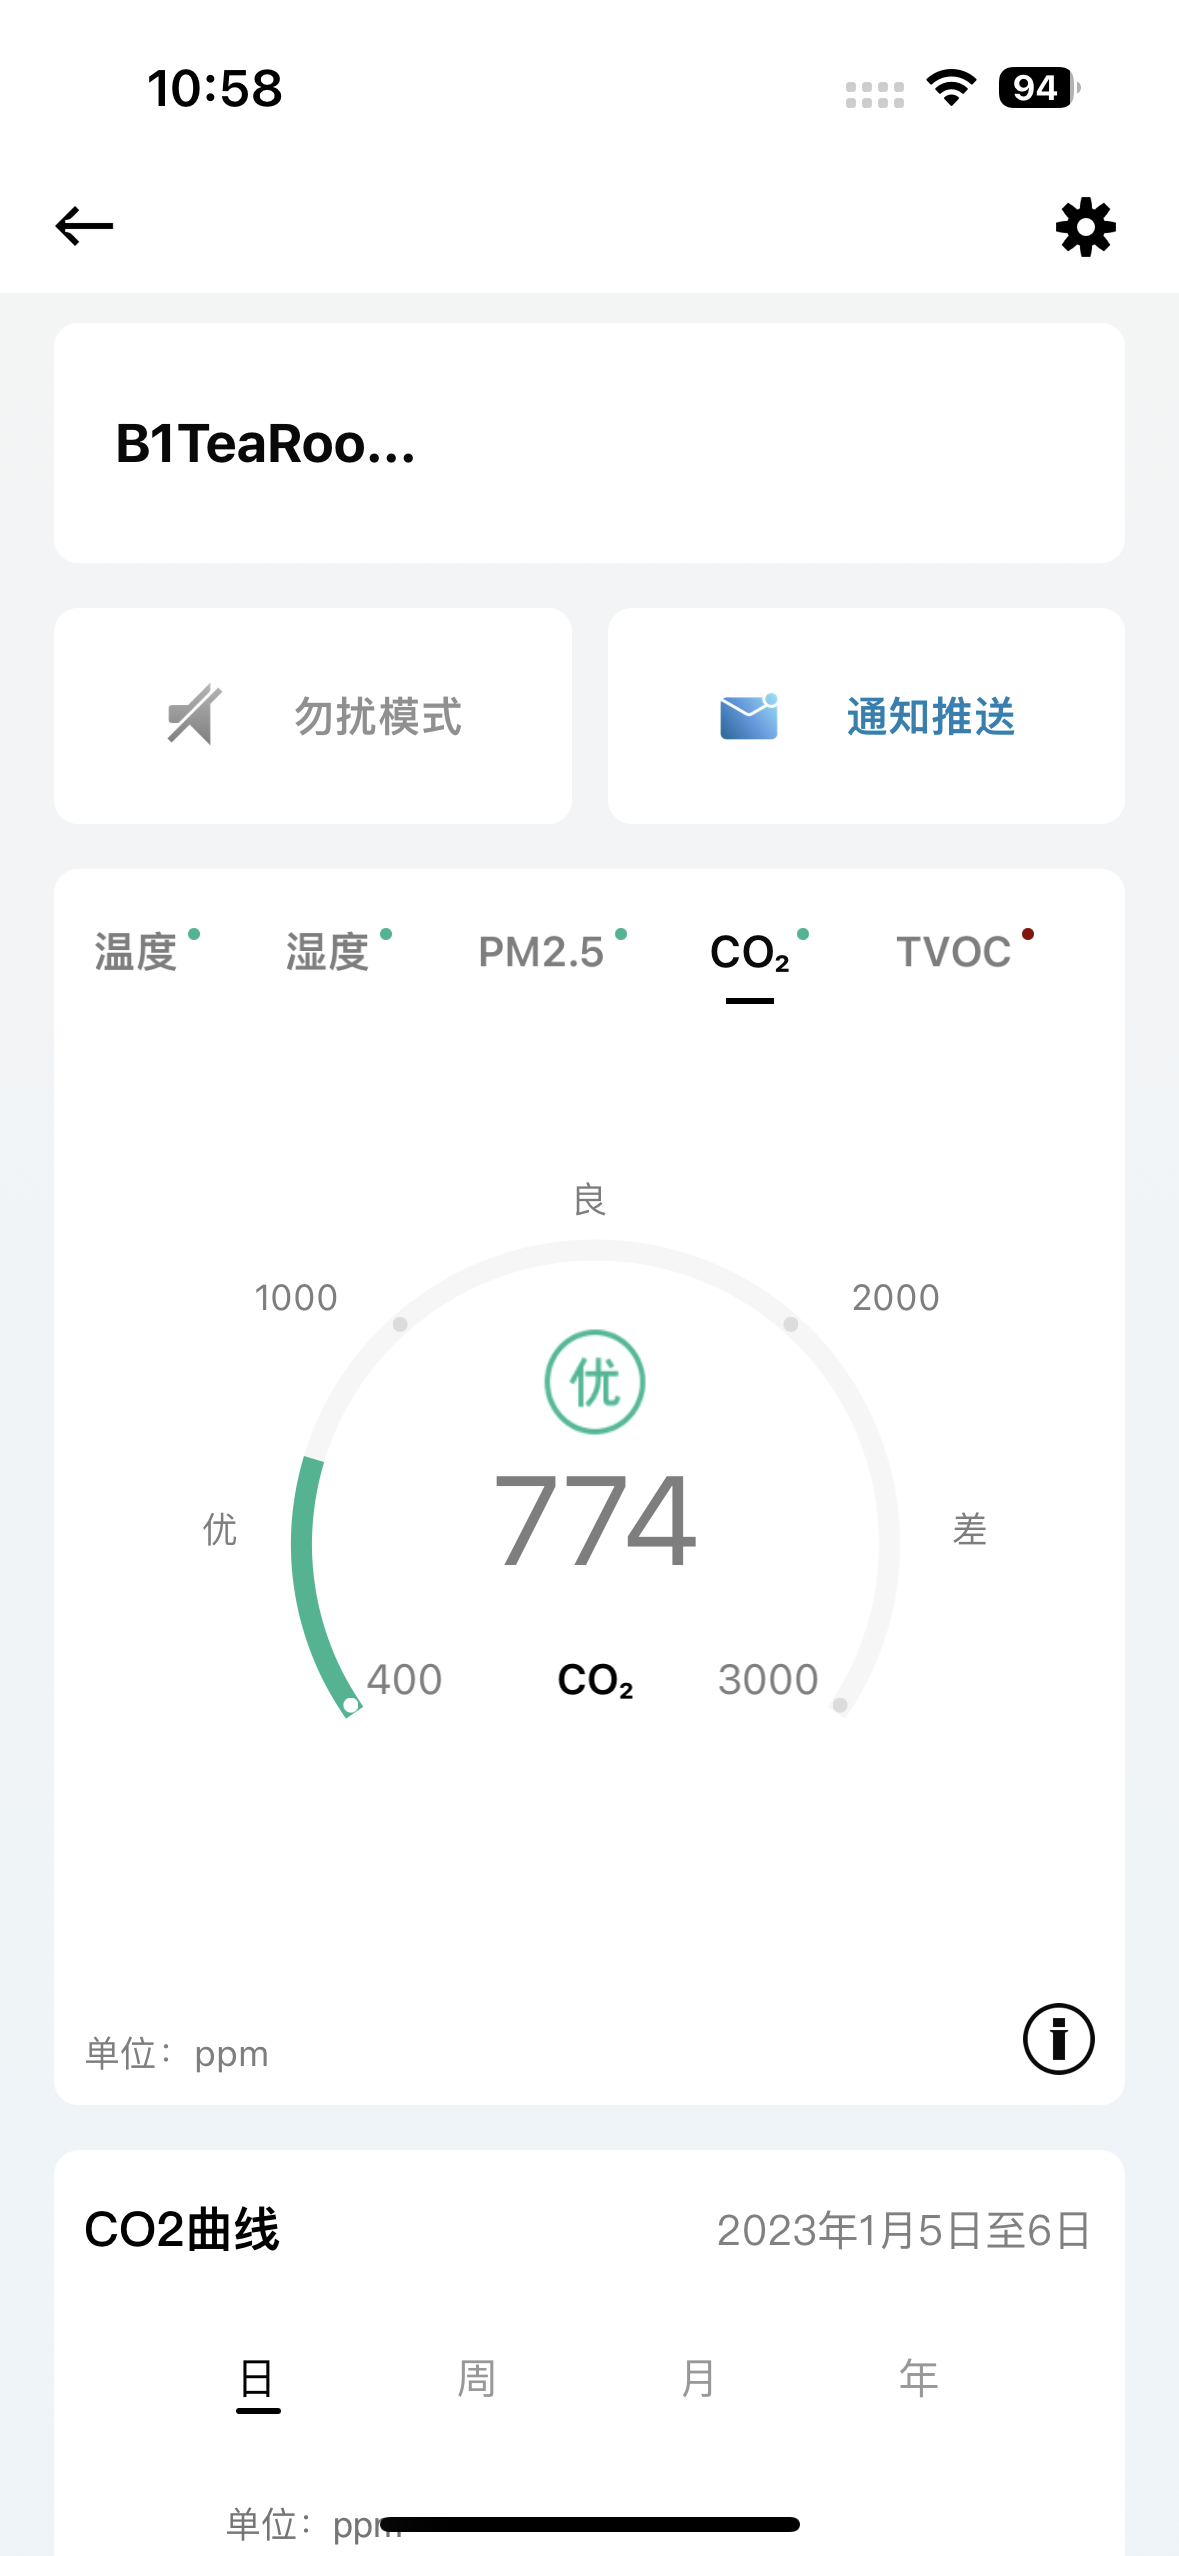
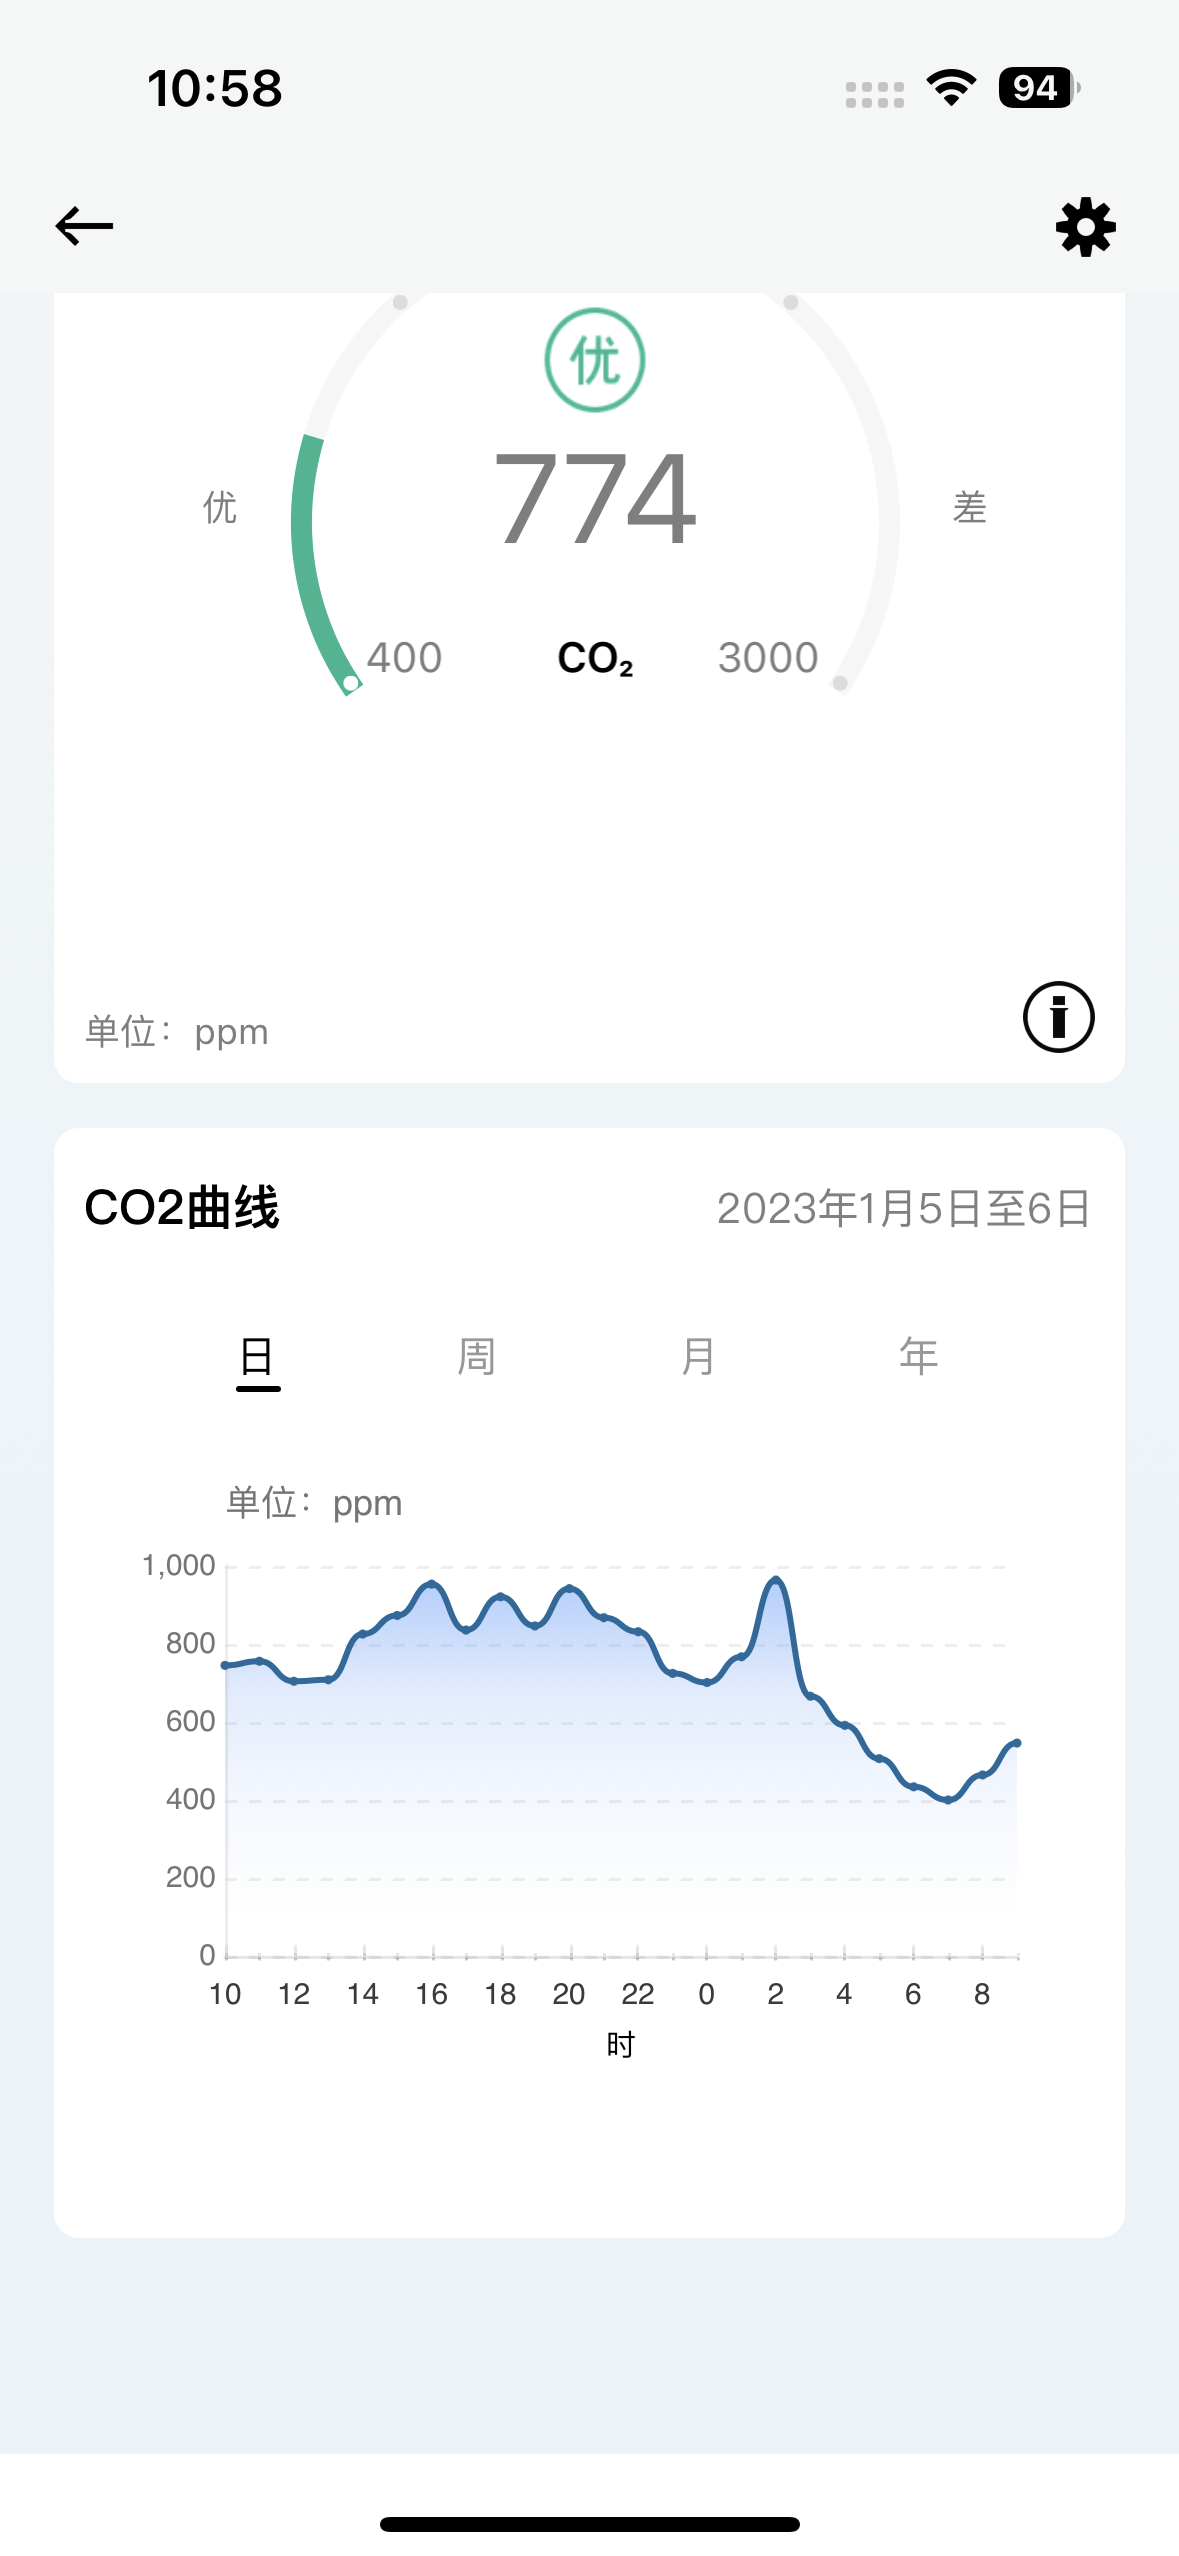
原本的传感器通电以后,需要通过大金的“金制空气”APP进行配置,使其连接到本地的Wifi局域网,并且需要和大金网关处于同一个网段内,然后就可以通过APP的“传感器”界面查看每一台传感器的各项数据,并且提供数据曲线查看功能,但仅此而已,这个APP并不支持相关的设备联动响应配置功能,APP界面见下图:
After the original sensor is powered on, it needs to be configured through Daikin’s “Golden Air” APP to connect to the local Wifi network, and it needs to be in the same network segment as the Daikin gateway, and then it can be connected to the APP. The interface checks the various data of each sensor and provides the function of viewing the data curve, but that’s all. This APP does not support the related device linkage response configuration function. Check the APP screenshot below:
传感器拆解 | Sensor Disassembly
大金空气传感器的拆解相对简单,不需要什么特殊的工具,而且整个外壳也没有使用很多螺丝用来紧固,下面六张图片完整展示了如何将传感器拆解:
The disassembly of the Daikin air sensor is simple, no special tools are required, and the entire housing does not use many screws for fastening. The following six pictures fully show how to disassemble the sensor:
第一步:将传感器右后侧的盖板向后推,即可拿下盖板;
Step 1: Push back the cover on the right side;
第二步:使用一个较细的螺丝刀,从箭头方向深入槽孔内,然后向外顶出面板;
Step 2: Use a screwdriver to go deep into the slot from the direction of the arrow, and then push out the front panel;
第三步:剪断扎带,将主板托架拉出;
Step 3: Cut off the cable tie and pull out the motherboard bracket;
第四步:拔掉所有连接线插头,将主板及各部分组件分离。
Step 4: Unplug all the connecting wires, and separate the main board and various components.
关键零组件介绍 | Key Components
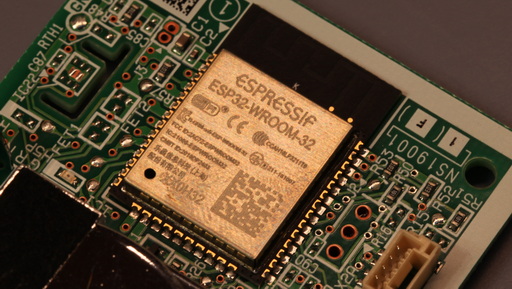
拆解完毕后,我们可以看到传感器的主板设计专业,做工精良,使用的各传感器也都是业界比较知名可靠的传感器,最关键的是它的主控采用的是ESP32-WROOM-32,这也就意味着我们可以无需对硬件进行任何改造就有可能将其重新刷机。
After dismantling, we can see that the main board of the sensor has a professional design and excellent manufacturing. The sensors used are all well-known and reliable sensors. The most important thing is that the main controller is ESP32-WROOM-32. It means that we can re-flash it without any modifications to the hardware.
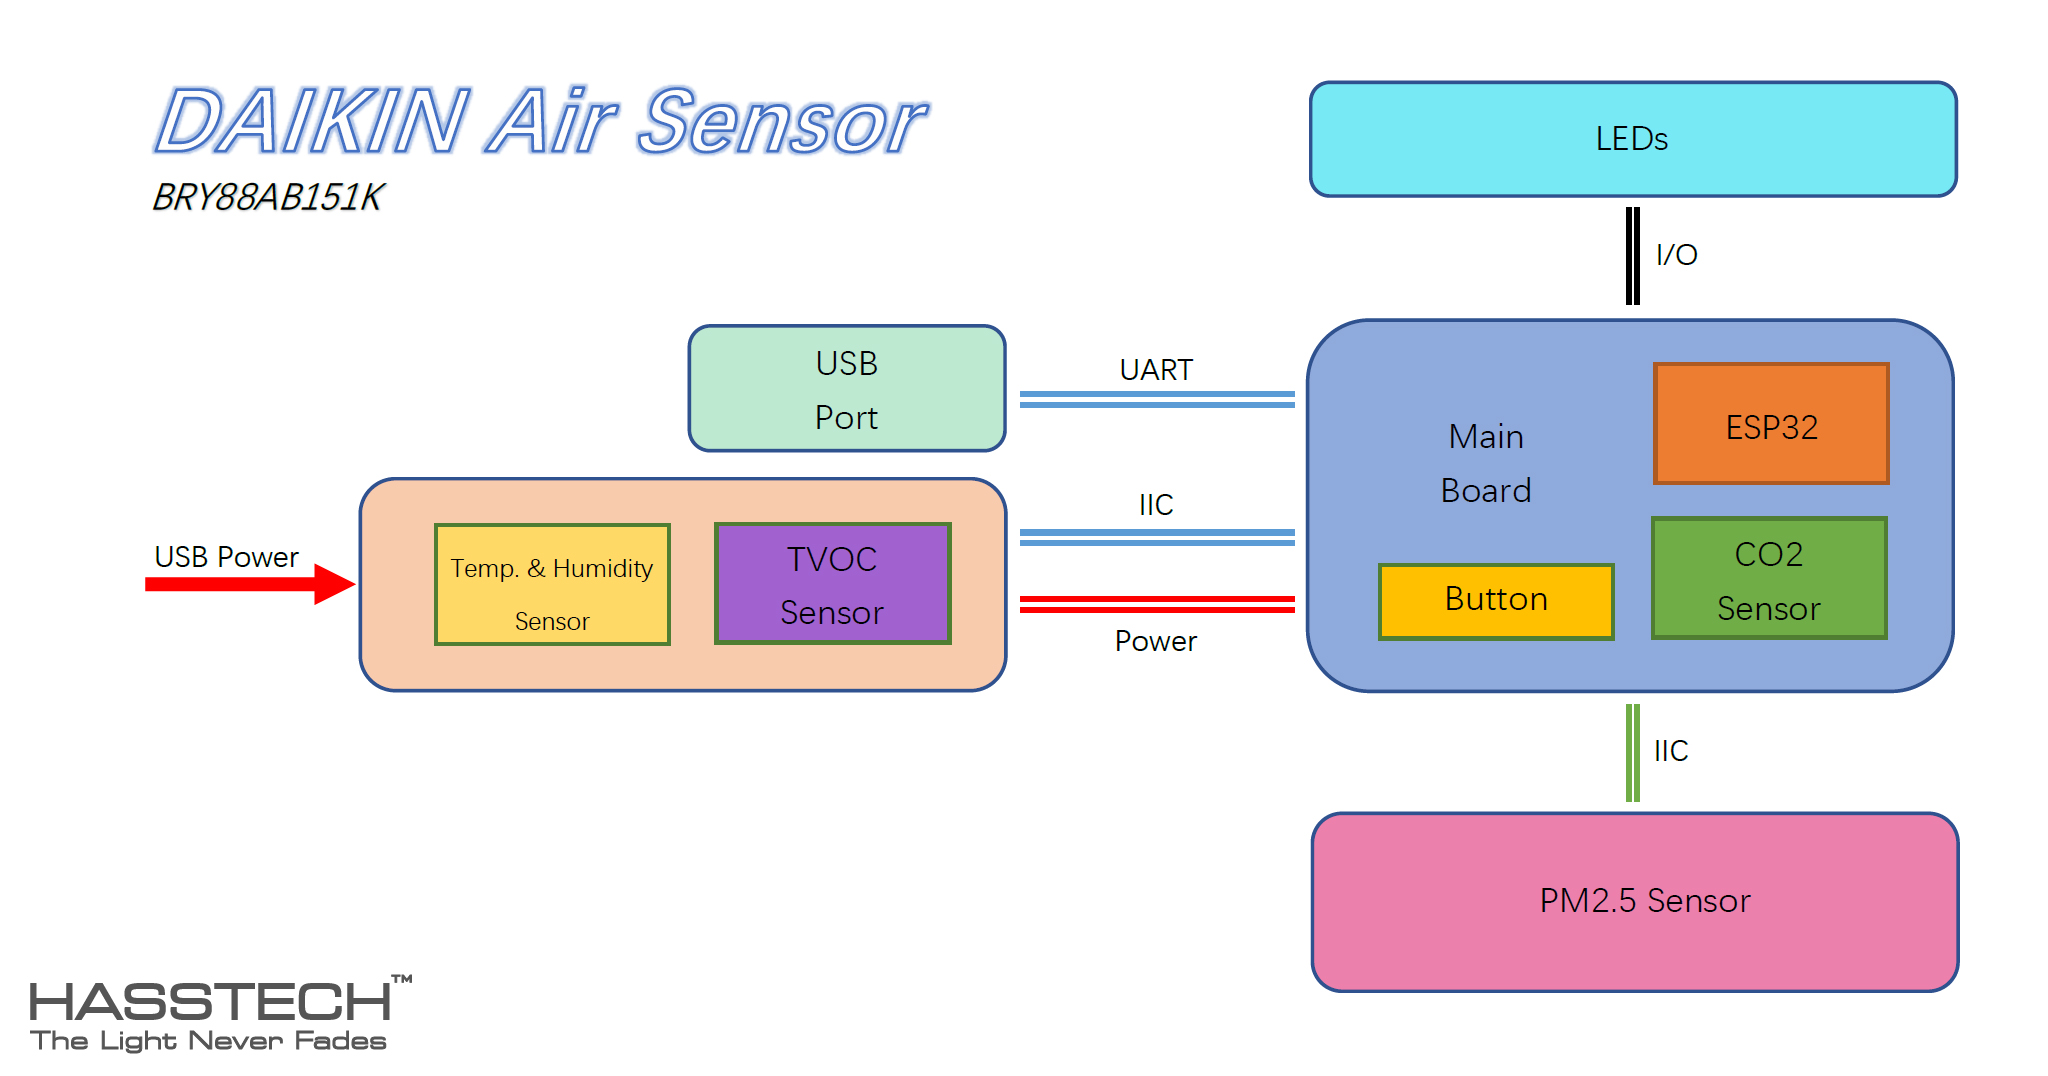
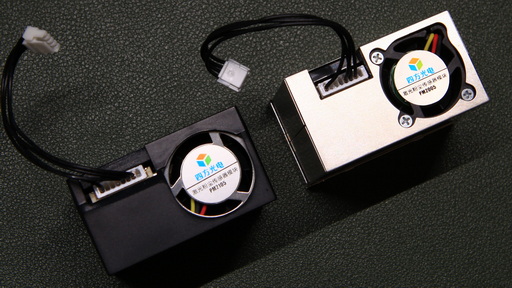
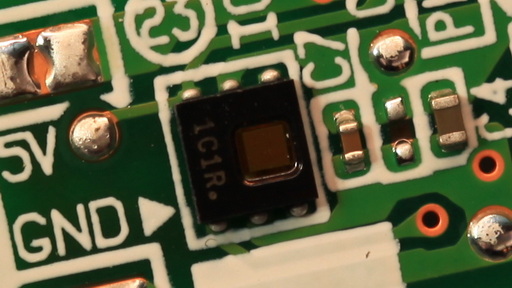
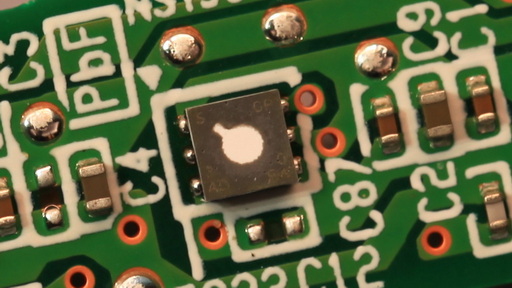
首先,我们可以看到主板上集成了主控ESP32模组,同时焊接了一个二氧化碳传感器,主板的侧面还集成了一个轻触开关。在主板托架上有一个黑色的长方体盒子,这个就是PM2.5传感器,他通过一组黑色的线束连接到主板上。前面板上面也安装了一块中间被挖空的电路板,通过一组蓝色的线束连接到主板上,共有5根线,我猜测它应该就是简单的连接了4个LED指示灯加上一条公共电源线。与主板相连的还有一个标准USB的插座小板,通过一组彩色的线束连接到主板上,原本以为这个或许就是ESP32刷机用的通讯端口,后来经过测量发现并不是,小板上标注了VCC,RXD,TXD,GND四个标识,看来是一个专用的串口,后来经过了解得知,这个接口是用来连接选配件甲醛传感器的。最后一组彩色的线缆是USB电源线过来的一组线束,通过观察发现,这个线束中间有一块窄小的电路板,上面集成了温湿度传感器和TVOC传感器。我们对各个关键零组件的资料进行了收集,了解了他们的性能参数,和通讯控制方式。下面就是大金空气传感器的主要零部件简介:
First of all, we can see that the controller ESP32 module is integrated on the main board, and a carbon dioxide sensor is soldered next to it, and a push button is also integrated on the side of the main board. There is a black box on the motherboard bracket, which is the PM2.5 sensor, and it is connected to the motherboard through a set of black wires. There is also a hollowed-out circuit board installed on the front panel, which is connected to the motherboard through a set of blue wires. There are 5 wires in total. I guess it should simply connect 4 LEDs and a power cable. There is also a standard USB socket board connected to the main board, which is connected to the main board through a set of colored wires. I thought this might be the communication port for ESP32 flashing, but after measurement, it was found that it was not, and the small board was marked with VCC. , RXD, TXD, GND, it seems to be a dedicated serial port, later learned that this interface is used to connect the optional formaldehyde sensor. The last group of colored cables is a set of wires from the USB power cable. There is a small circuit board in the middle of the wire harness, which integrates a temperature and humidity sensor and a TVOC sensor. We collected the datasheet of each key component and learned about their performance parameters and communication methods. The following is a brief introduction to the main components of the Daikin air sensor:

确定原理图连接 | Identify Schematic Connections
接下来我们需要做的就是理清这些传感器与ESP32主控之间的连接线路,把基本的通讯线路原理图整理出来。通过测量,我们整理出了如下的传感器通讯线路与ESP32的I/O的对应关系图表:
Next, we need to do is to sort out the connection lines between these sensors and the ESP32 controller. After measurement, we sorted out the following chart:
以上这些传感器是原本已经设计并焊接好的,我们只需要了解他们的对应关系即可,无需对硬件做任何改动,但是如果我们要对ESP32进行烧录,尤其是在ESPHome的烧录文件首次下载时,我们还需要确定烧录串口的引脚位置,以及RST和GPIO0的位置。
The above sensors have been designed and soldered, we only need to understand their corresponding relationship, without any changes to the hardware, but if we want to flash ESP32, especially in the first download of the firmware of ESPHome, we also need to determine the pin position of the flashing serial port, as well as the position of RST and GPIO0.
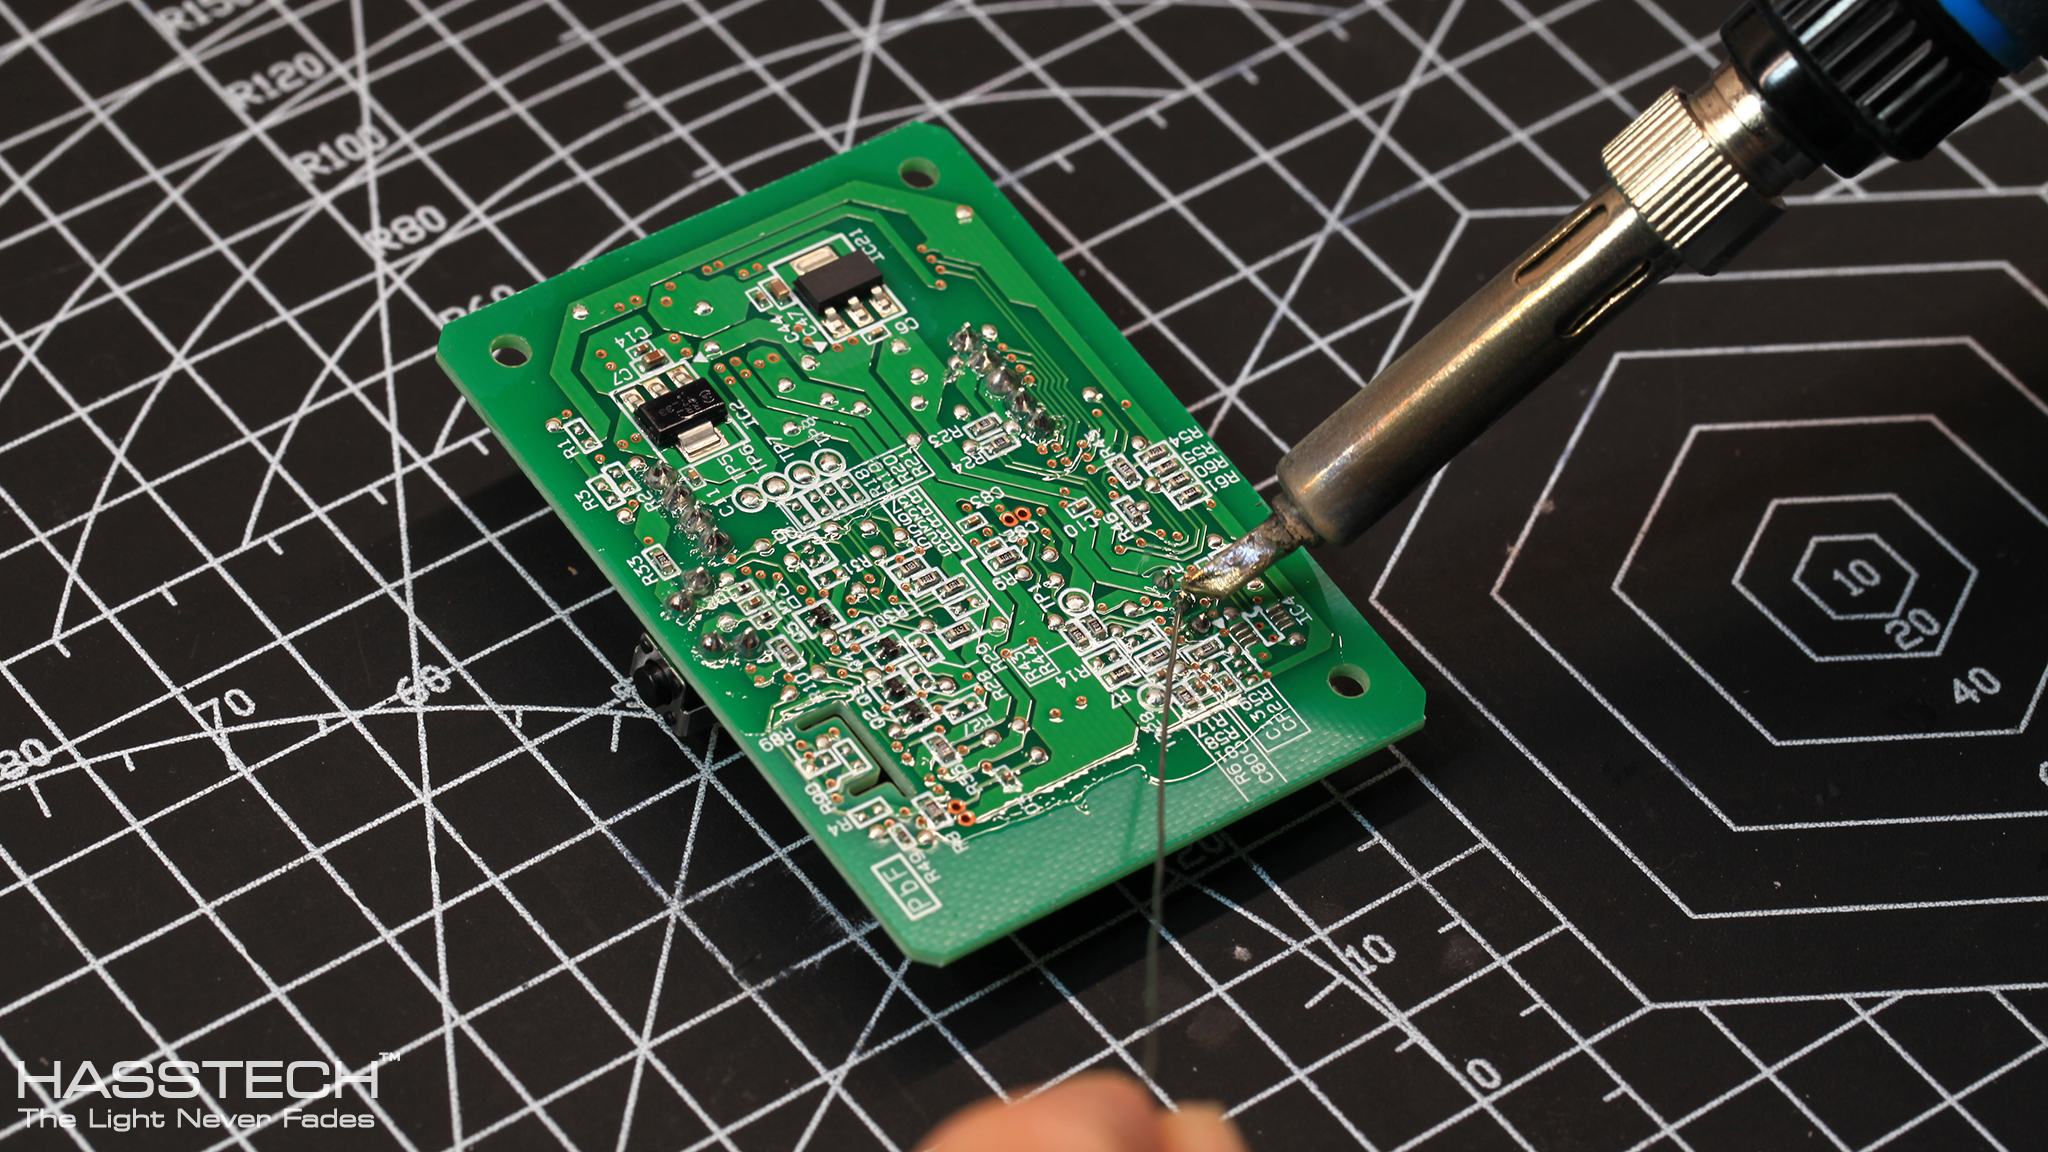
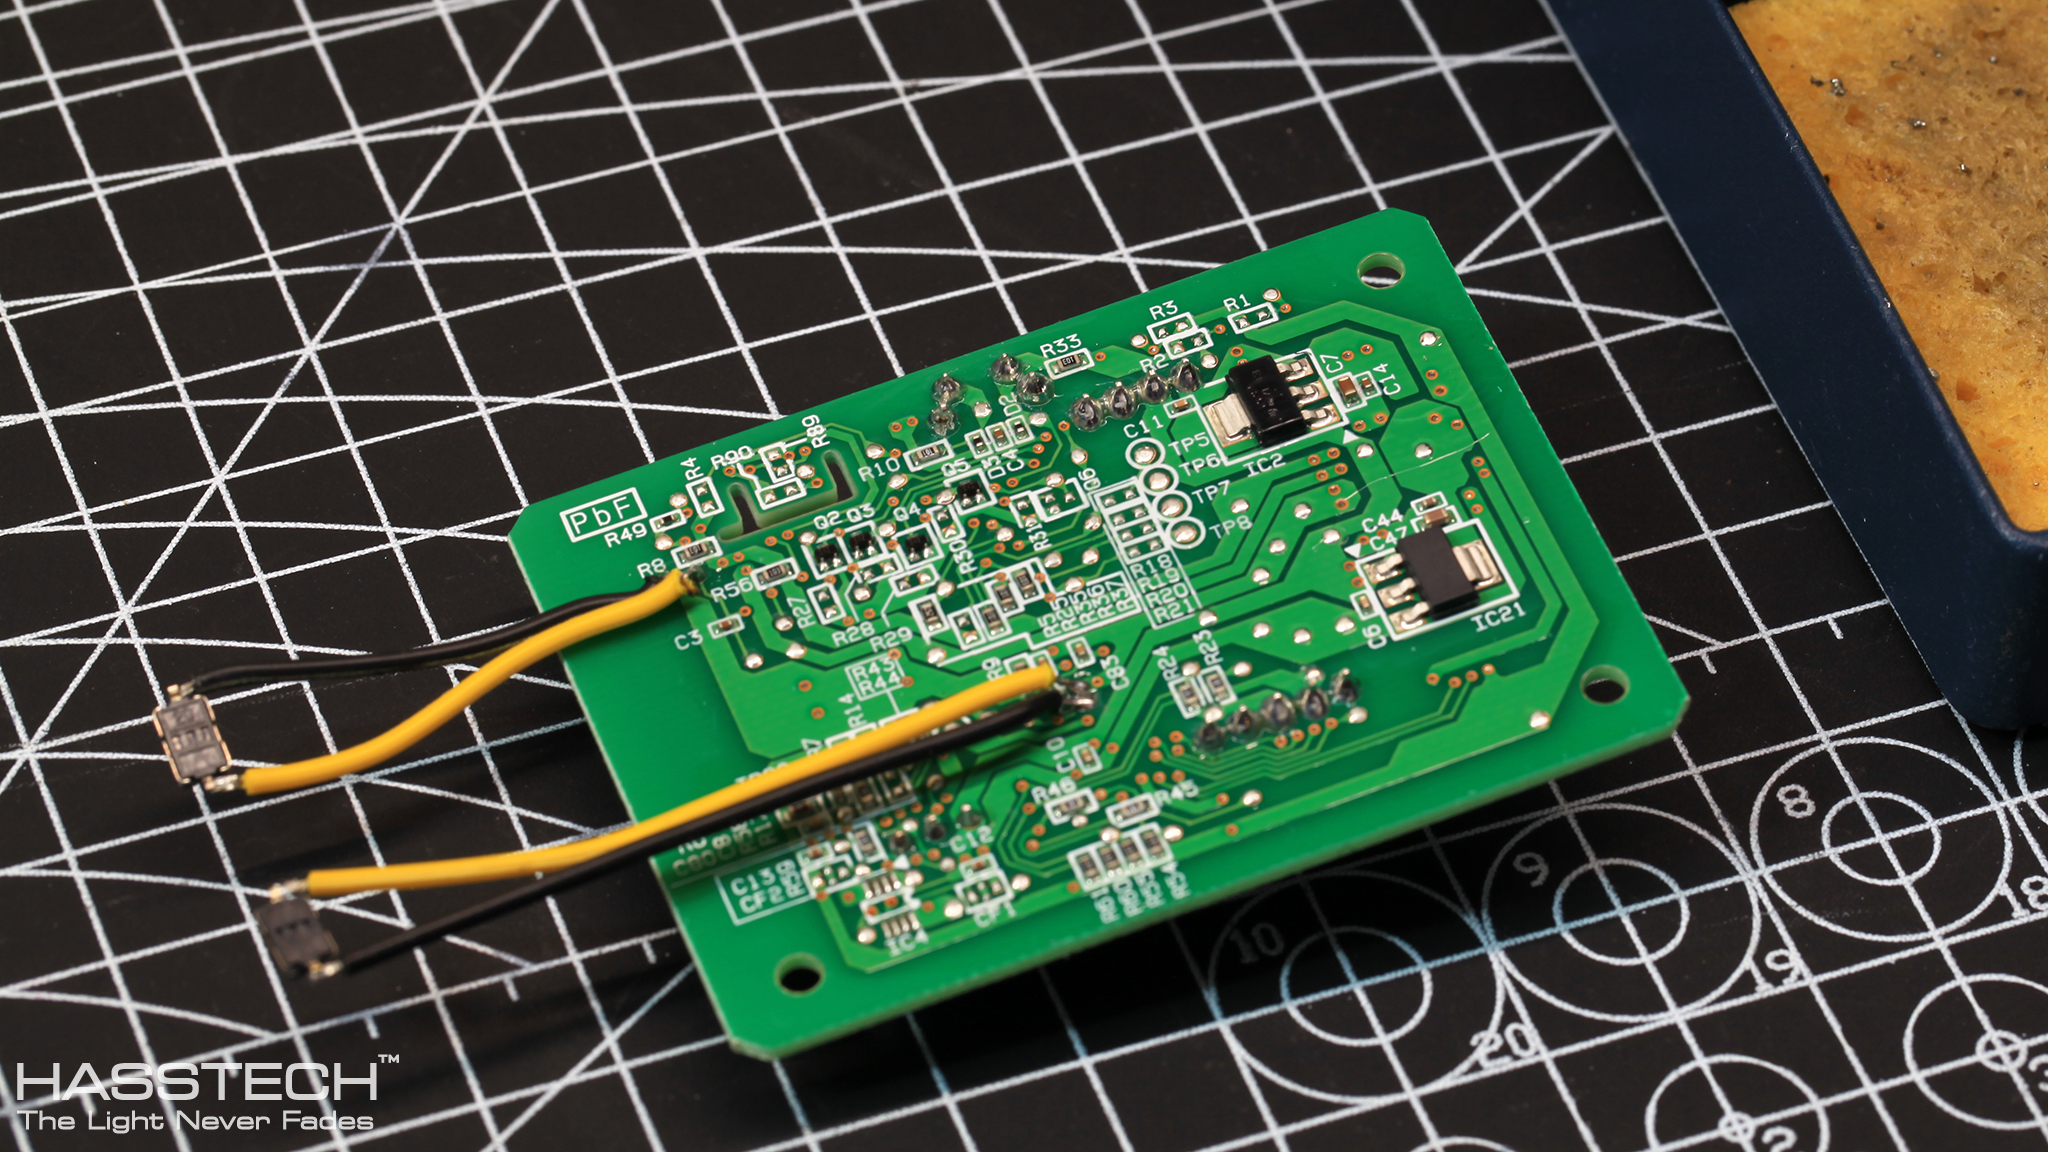
经过测量,我们找出了主板上的这些烧录需要用到的引脚位置,并且,我们为烧录串口焊接了3个插针,为RST和GPIO0两个引脚焊接了两个轻触开关以方便烧录引导,连接好烧录所需的USB->TTL串口转换器以后就可以进行固件烧录了。具体请看下图:
After measurement, we found the pins for the programming on the main board, and we soldered 3 pins for the serial port, and soldered two buttons for the RST and GPIO0 pins for burning boot, after connecting the USB->TTL converter, you can flash the firmware. Please check the details below:


ESPHome程序接入 | Integrate in ESPHome Platform
确定了各部分硬件之间的连接方式,并且做好了烧录准备,下一步我们就开始将它重新编程,接入ESPHome的平台。下面我们将按模块来分,将每一个硬件部分整合进ESPHome平台。在这里,我会将我所使用的代码全部展示出来,供给大家参考,也欢迎大家能够创造出自己不同的玩法并分享给我们!
After confirming the connection method of each part of the hardware and making preparations for flashing, the next step is to reprogram it and connect it to the ESPHome platform. Next, we will divide by module and integrate each hardware part into the ESPHome platform. Here, I will show all the codes I use for your reference, and you are welcome to create your own different ways to play and share them with us!
二氧化碳传感器接入 | CO2 Sensor CM1106
感谢大神louliangsheng提供CO2 cm1106的库文件
substitutions:
  devicename: daikin-airsensor
  friendly_name: DAIKIN Air Sensor
  device_description: DAIKIN Air Sensor BRY88AB151K

esphome:
  name: $devicename
  comment: ${device_description}
  project:
    name: "DAIKIN.BRY88AB151K"
    version: "BRY88AB151K"
  includes:
    - "cm1106.h"

uart:
- id: cm1106_uart
  rx_pin: GPIO16
  tx_pin: GPIO17
  baud_rate: 9600

sensor:
- platform: wifi_signal
  name: "${friendly_name} Wifi Signal"
  update_interval: 30s
- platform: uptime
  name: "${friendly_name} Uptime"
- platform: custom
  lambda: |-
    auto cm1106Sensor = new CM1106Sensor(id(cm1106_uart), 10000);
    App.register_component(cm1106Sensor);
    return {cm1106Sensor};
  sensors:
  - name: "${friendly_name} CO2"
    id: daikinco2
    accuracy_decimals: 0
    unit_of_measurement: "ppm"
    device_class: carbon_dioxide
PM1/PM2.5/PM10传感器接入 | PM1/PM2.5/PM10 Sensor
substitutions:
  devicename: daikin-airsensor-b1-study
  friendly_name: DAIKIN Air Sensor B1 Study
  device_description: DAIKIN Air Sensor BRY88AB151K

esphome:
  name: $devicename
  comment: ${device_description}
  project:
    name: "DAIKIN.BRY88AB151K"
    version: "BRY88AB151K"
  includes:
    - pm2005.h          # For PM2005 module
#    - pm2105.h          # For PM2105 module

- platform: custom
  lambda: |-
    auto pmsensor = new pm2005();
    App.register_component(pmsensor);
    return {pmsensor->vpm1, pmsensor->vpm25, pmsensor->vpm10};
  sensors:
  - name: "${friendly_name} PM1"
    id: daikinpm1
    unit_of_measurement: μg/m³
    accuracy_decimals: 0
    device_class: PM1
  - name: "${friendly_name} PM2.5"
    id: daikinpm25
    unit_of_measurement: μg/m³
    accuracy_decimals: 0
    device_class: PM25
  - name: "${friendly_name} PM10"
    id: daikinpm10
    unit_of_measurement: μg/m³
    accuracy_decimals: 0
    device_class: PM10

i2c:
- id: PM25_bus
  sda: 23
  scl: 22
  scan: true
- id: sgp30_bus
  sda: 19
  scl: 21
  scan: true
HDC1080温湿度传感器接入 | HDC1080 Temperature and Humidity Sensor
- platform: hdc1080
  i2c_id: sgp30_bus
  temperature:
    name: "${friendly_name} Temperature"
    filters:
      - offset: -4.0
    id: temperature
  humidity:
    name: "${friendly_name} Humidity"
    filters:
      - offset: 6.0
    id: humidity
  update_interval: 30s

i2c:
- id: PM25_bus
  sda: 23
  scl: 22
  scan: true
- id: sgp30_bus
  sda: 19
  scl: 21
  scan: true
SGP30 TVOC/eCO2传感器接入 | SGP30 TVOC/eCO2 Sensor
- platform: sgp30
  i2c_id: sgp30_bus
  eco2:
    name: "${friendly_name} eCO2"
    accuracy_decimals: 1
  tvoc:
    name: "${friendly_name} TVOC"
    id: daikintvocppb
    filters:
#      - lambda: return x * 0.0023;        #ppd -> mg/m³
      - lambda: return x * 2.3;        #ppd -> μg/m³
      - exponential_moving_average:
          alpha: 0.1
          send_every: 10
          send_first_at: 1
#    unit_of_measurement: "mg/m³"
    unit_of_measurement: "μg/m³"
#    accuracy_decimals: 2
    accuracy_decimals: 0
  compensation:
    temperature_source: temperature
    humidity_source: humidity
  store_baseline: yes
  address: 0x58
  update_interval: 1s

i2c:
- id: PM25_bus
  sda: 23
  scl: 22
  scan: true
- id: sgp30_bus
  sda: 19
  scl: 21
scan: true 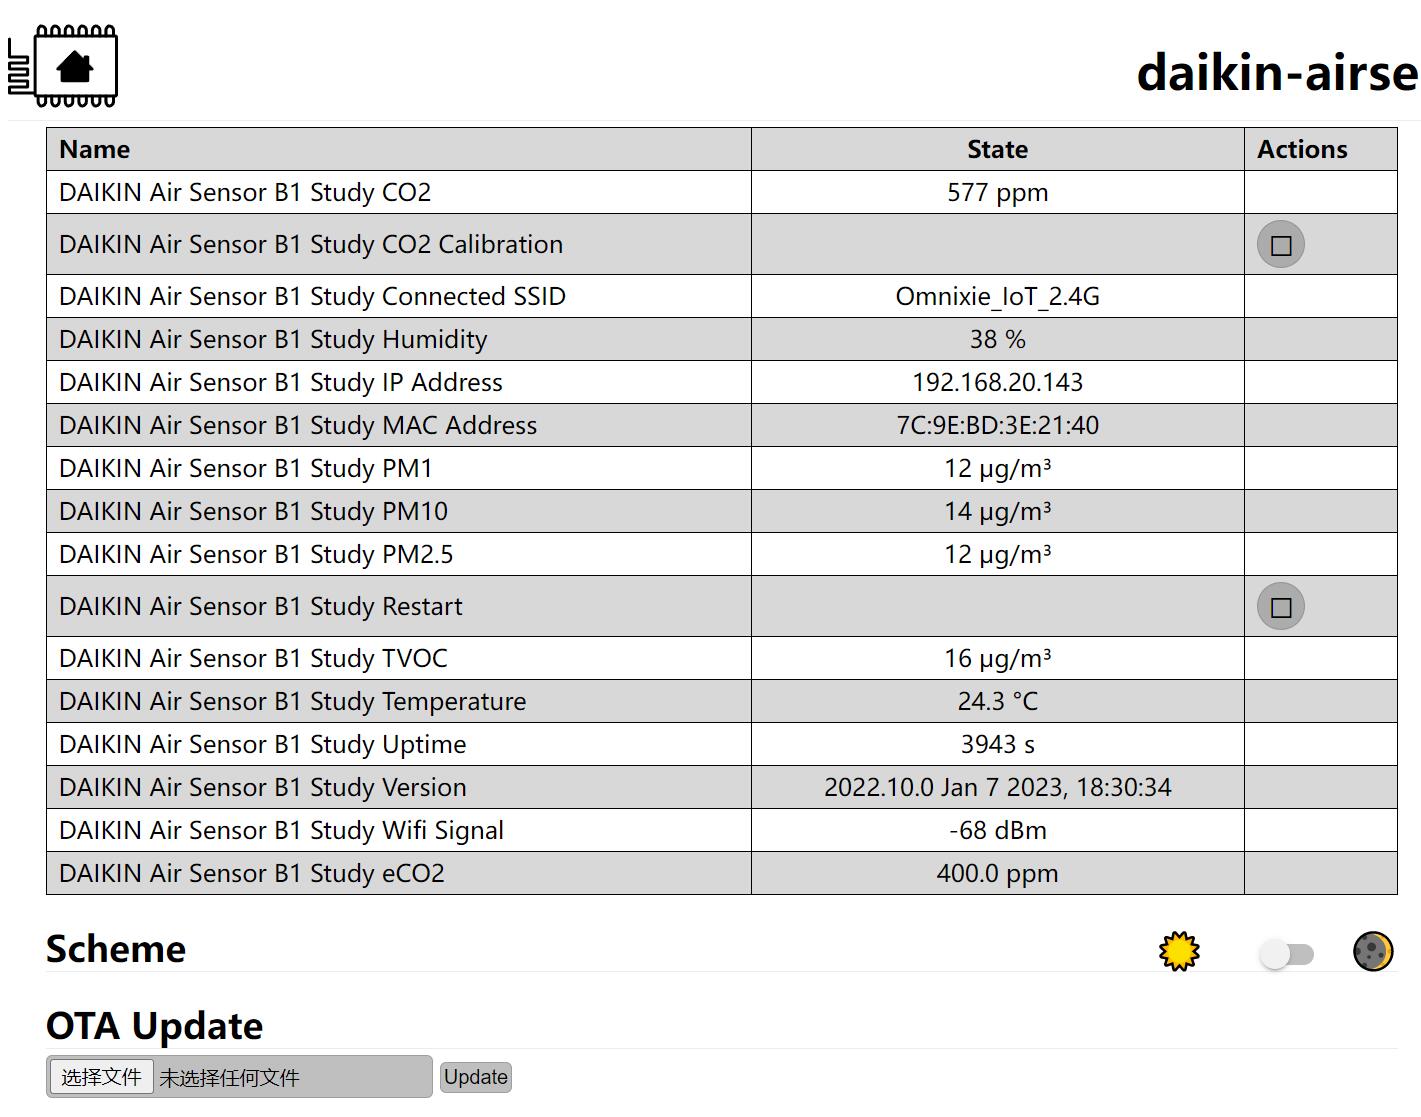
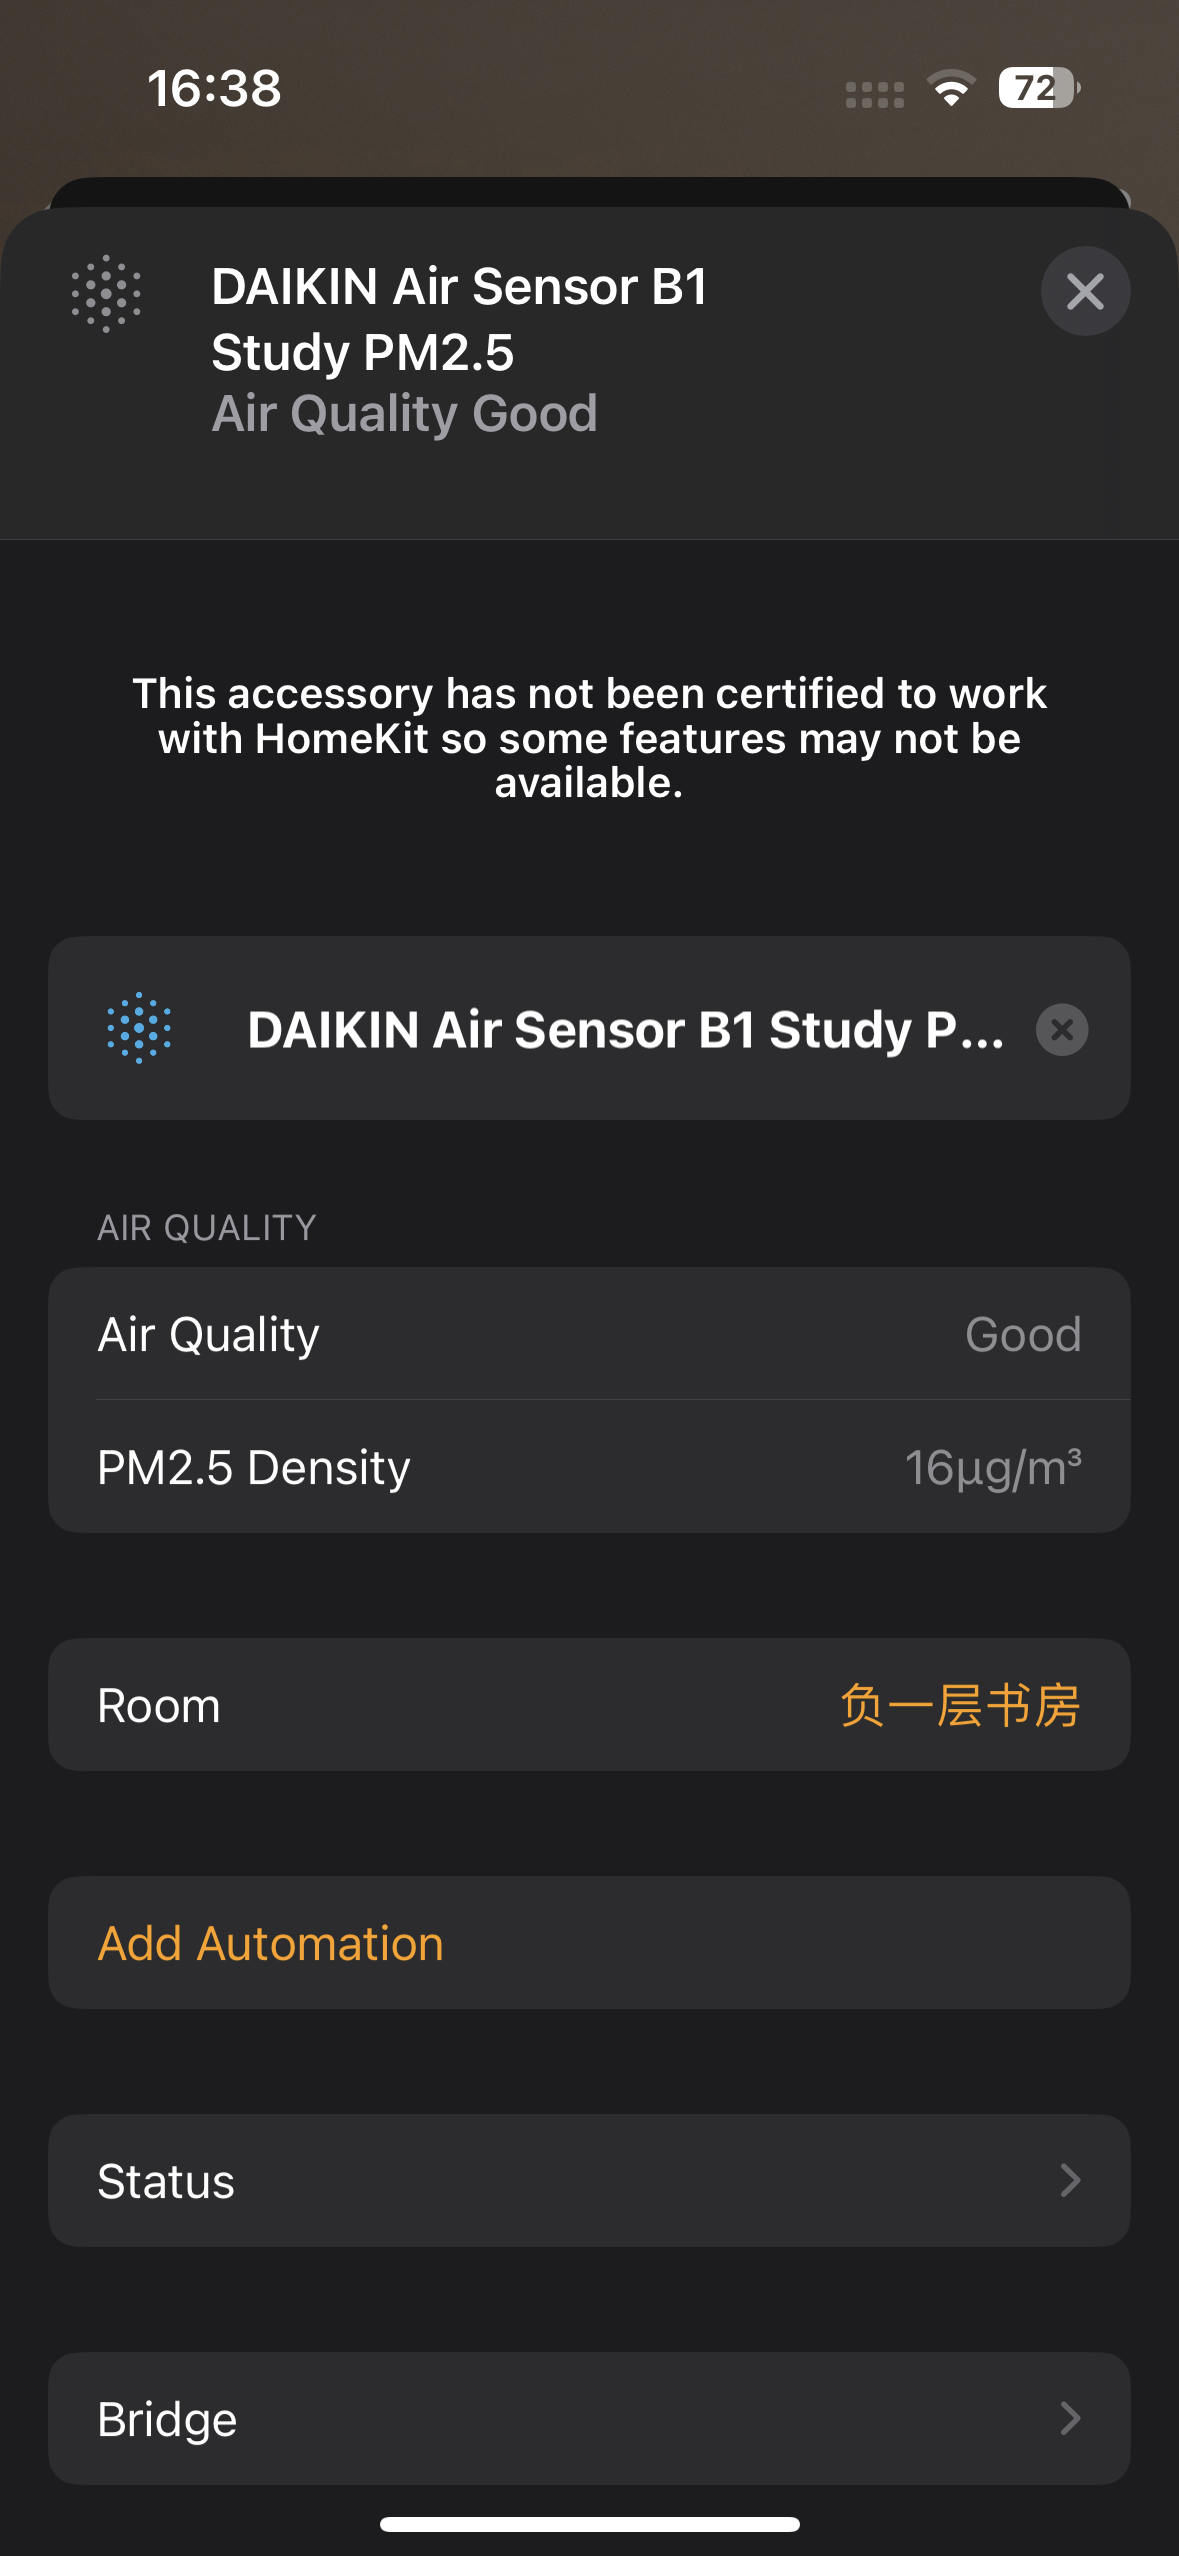
上图是我的位于地下室书房的大金空气传感器ESPHome数据界面,yaml配置文件也在下方,需要的可以下载后根据自己的需求进行修改使用。
The picture above is my ESPHome data interface of the Daikin air sensor located in the basement study, and the yaml configuration file is also shared below, you can download it and modify it according to your own needs.
集成及应用 | Integration and Application
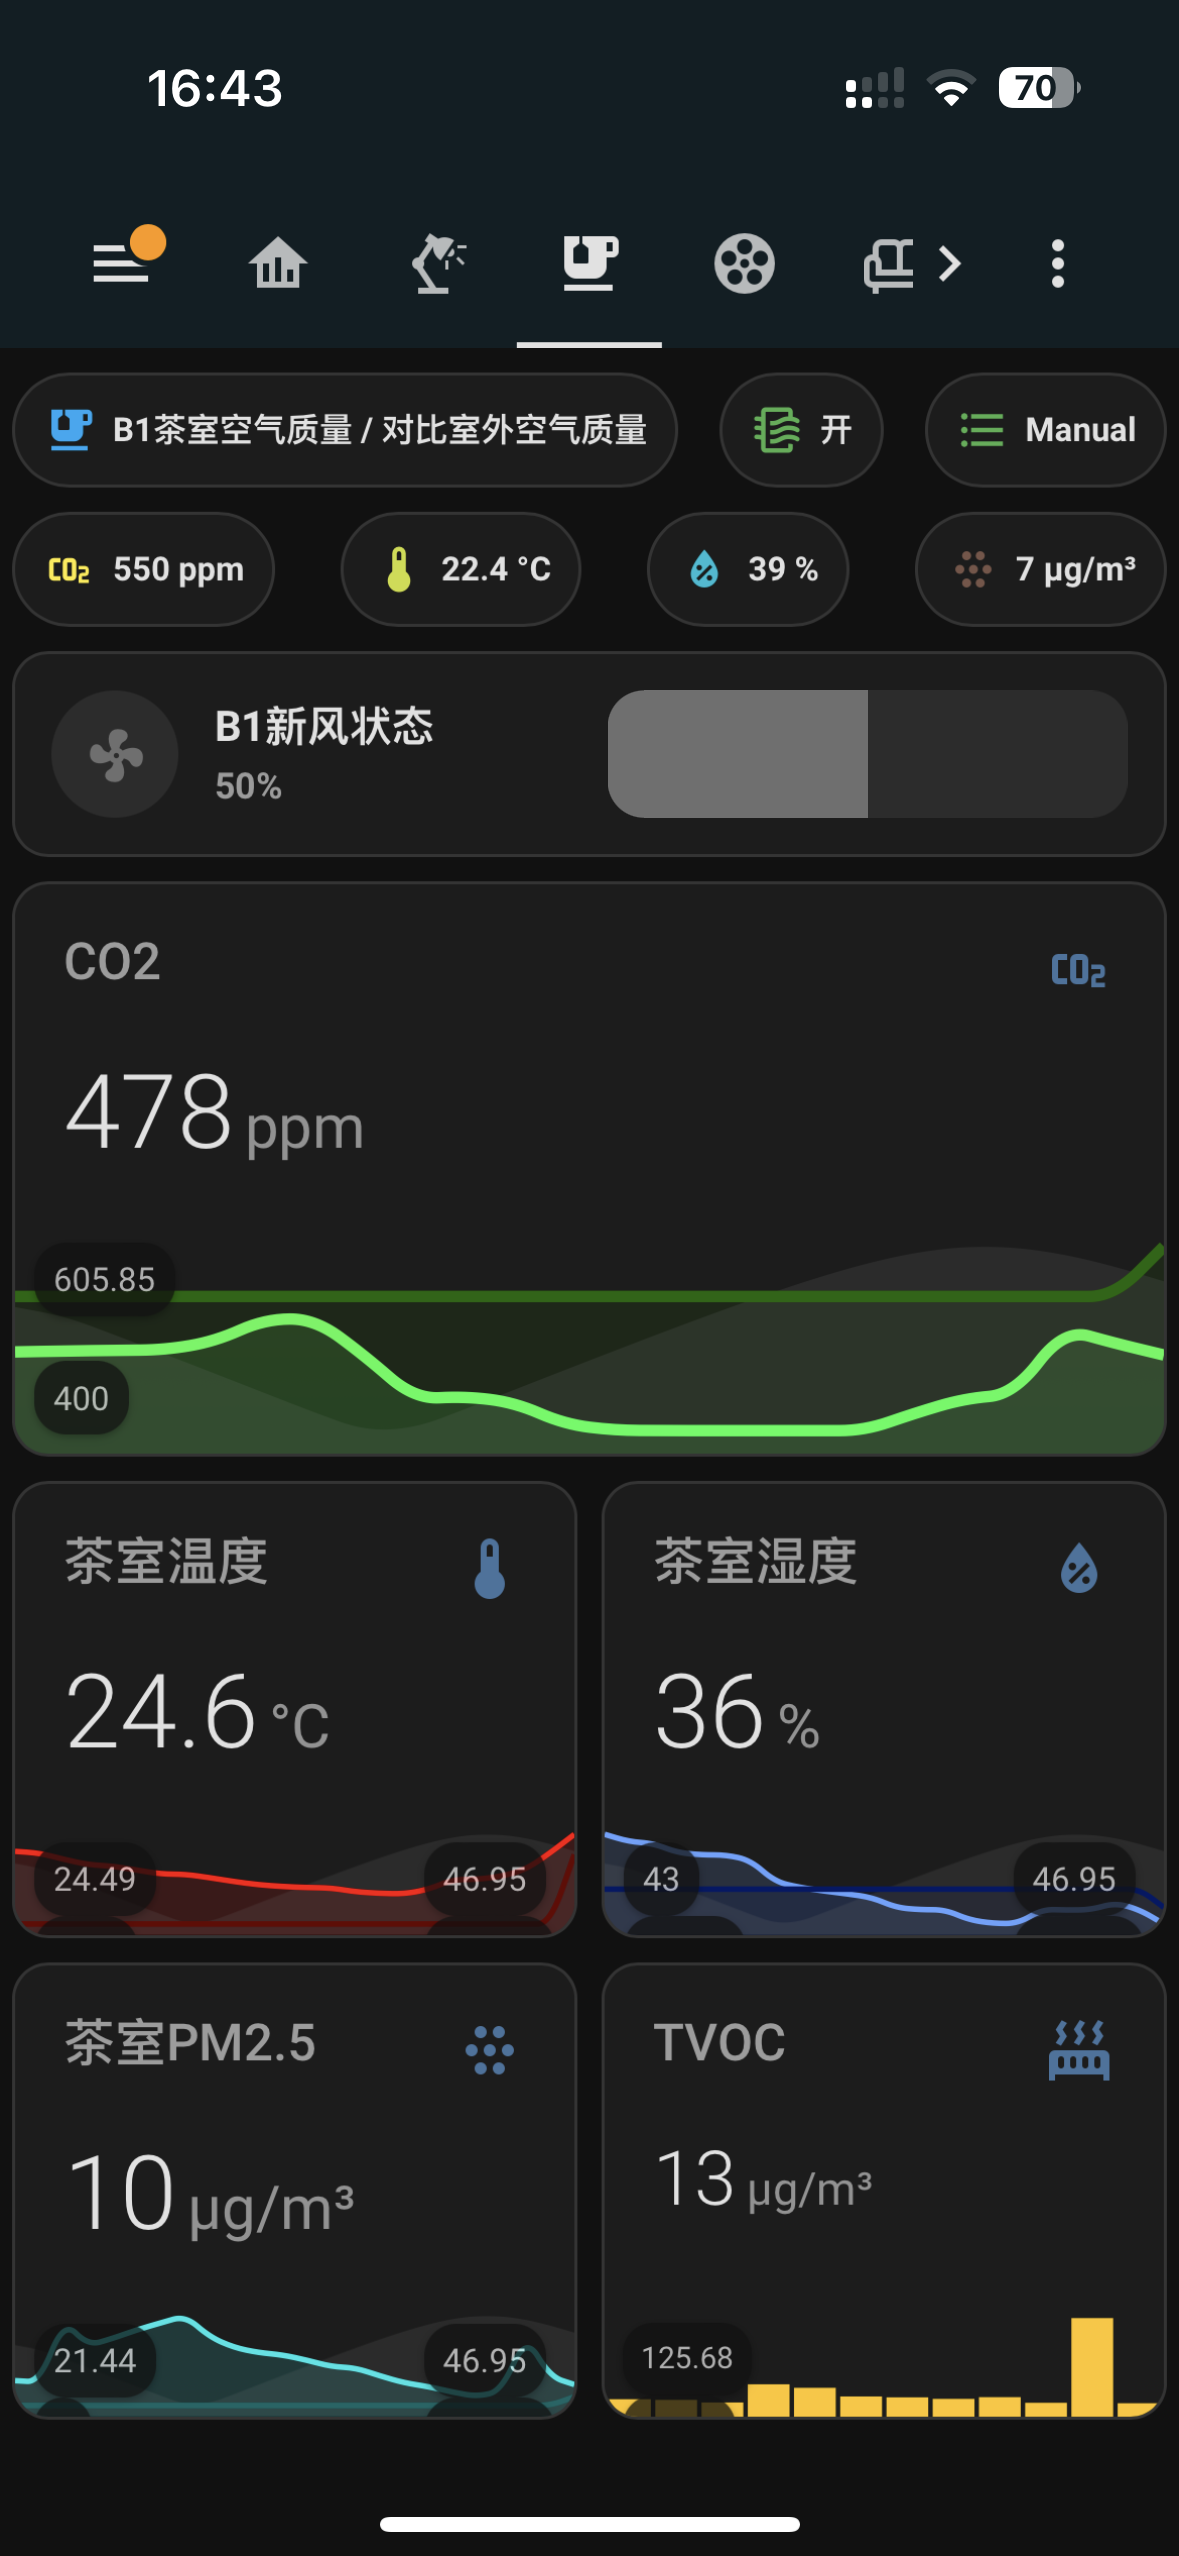
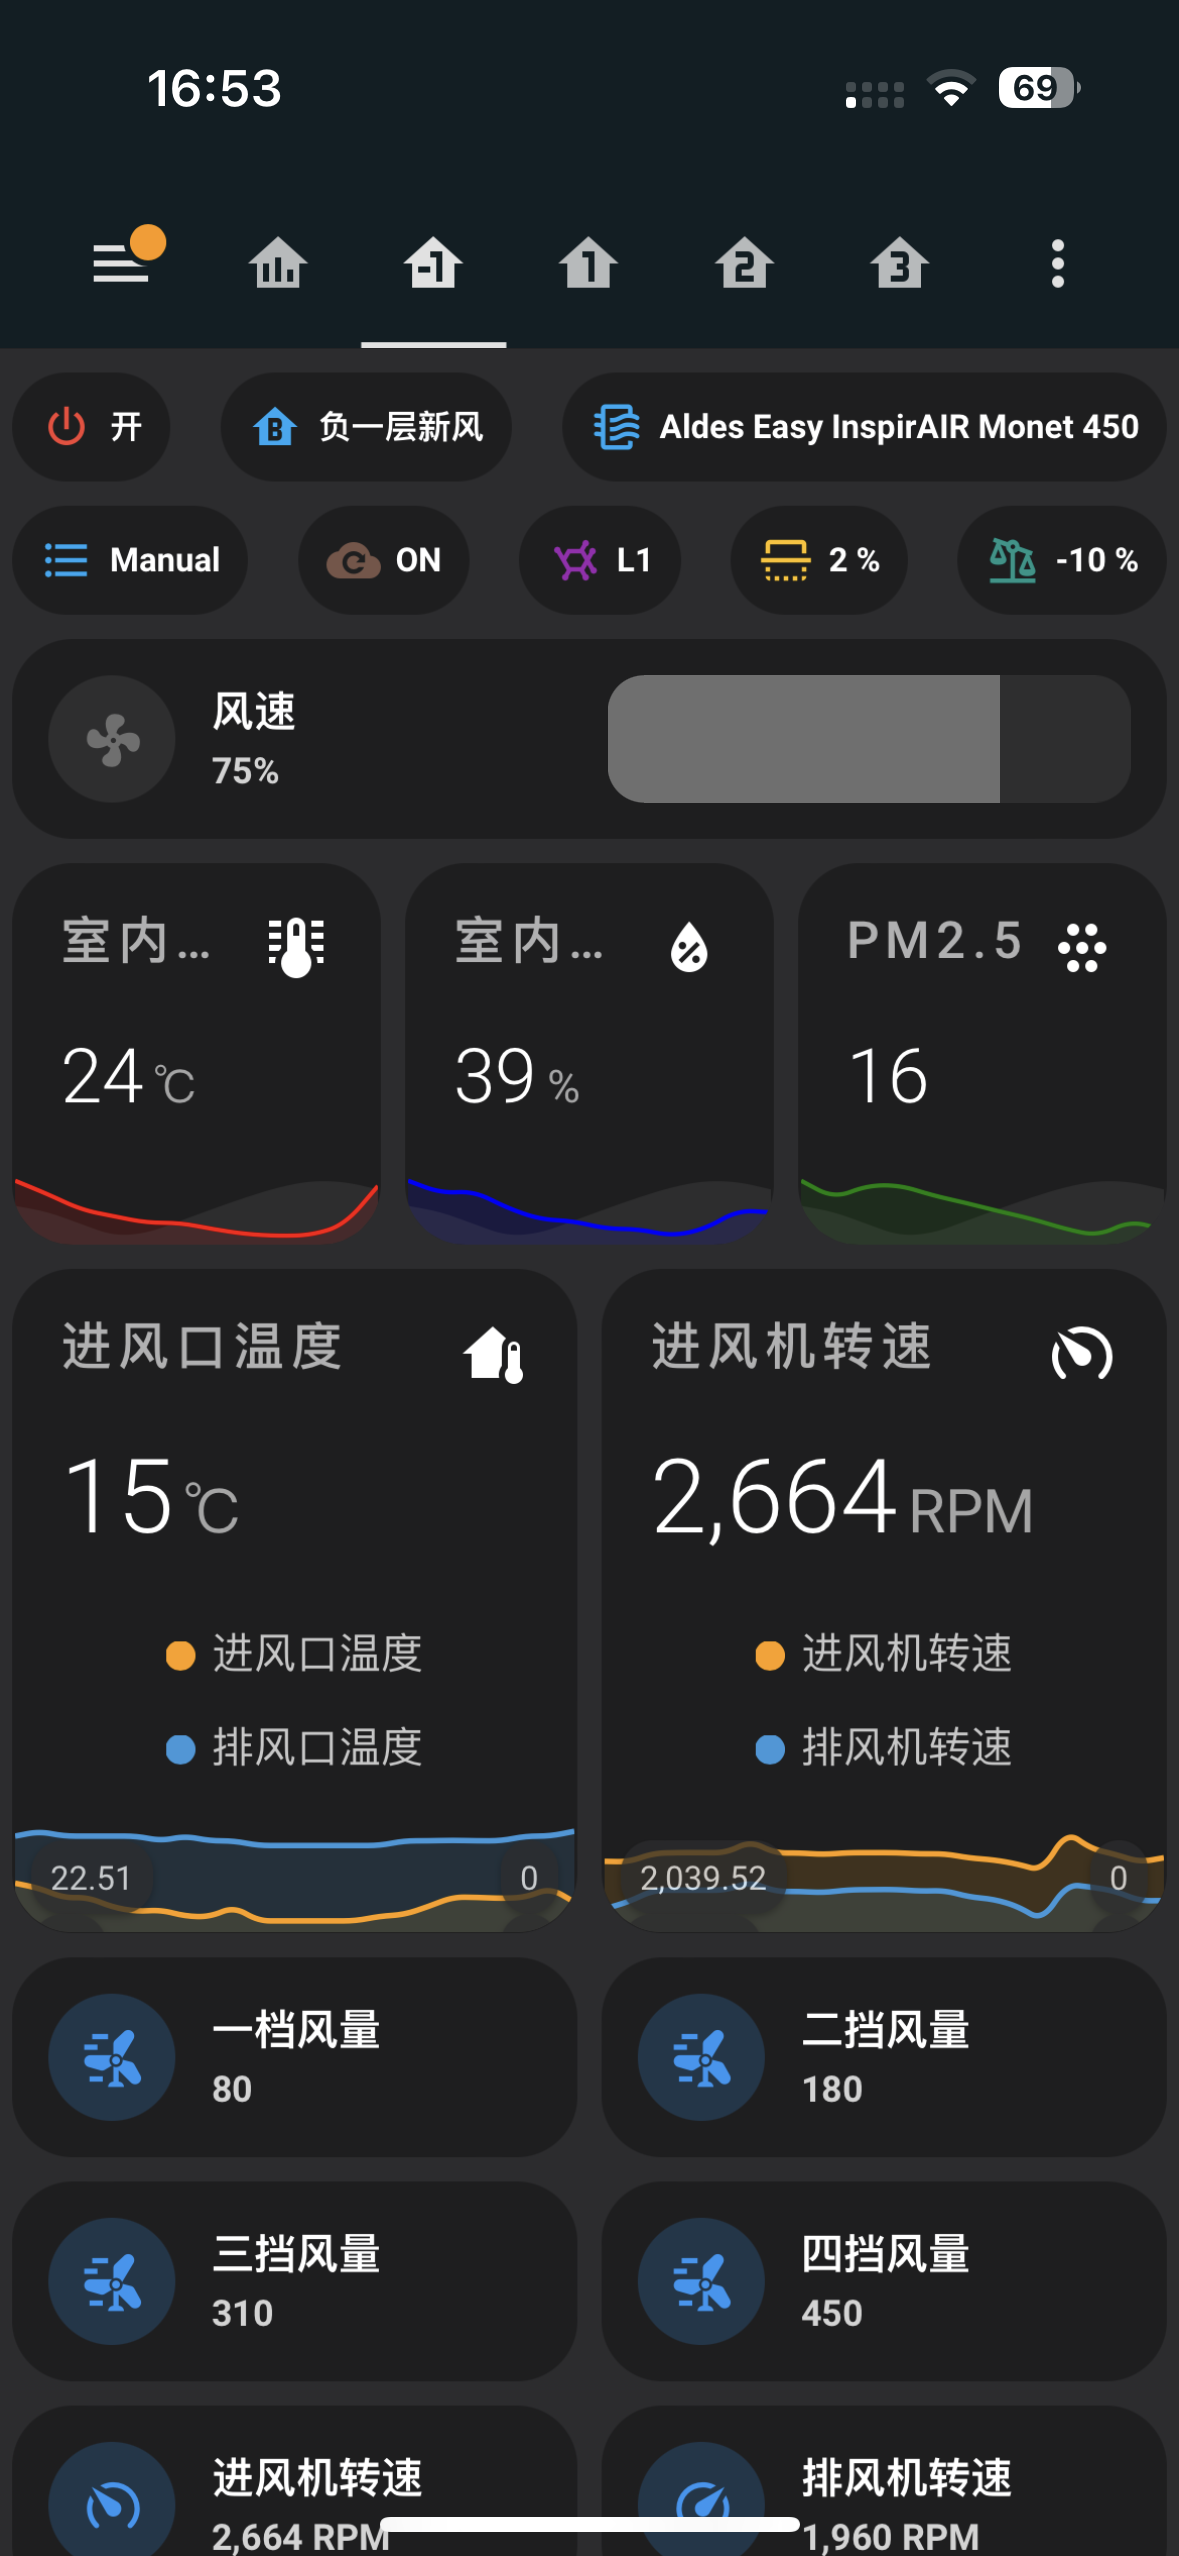
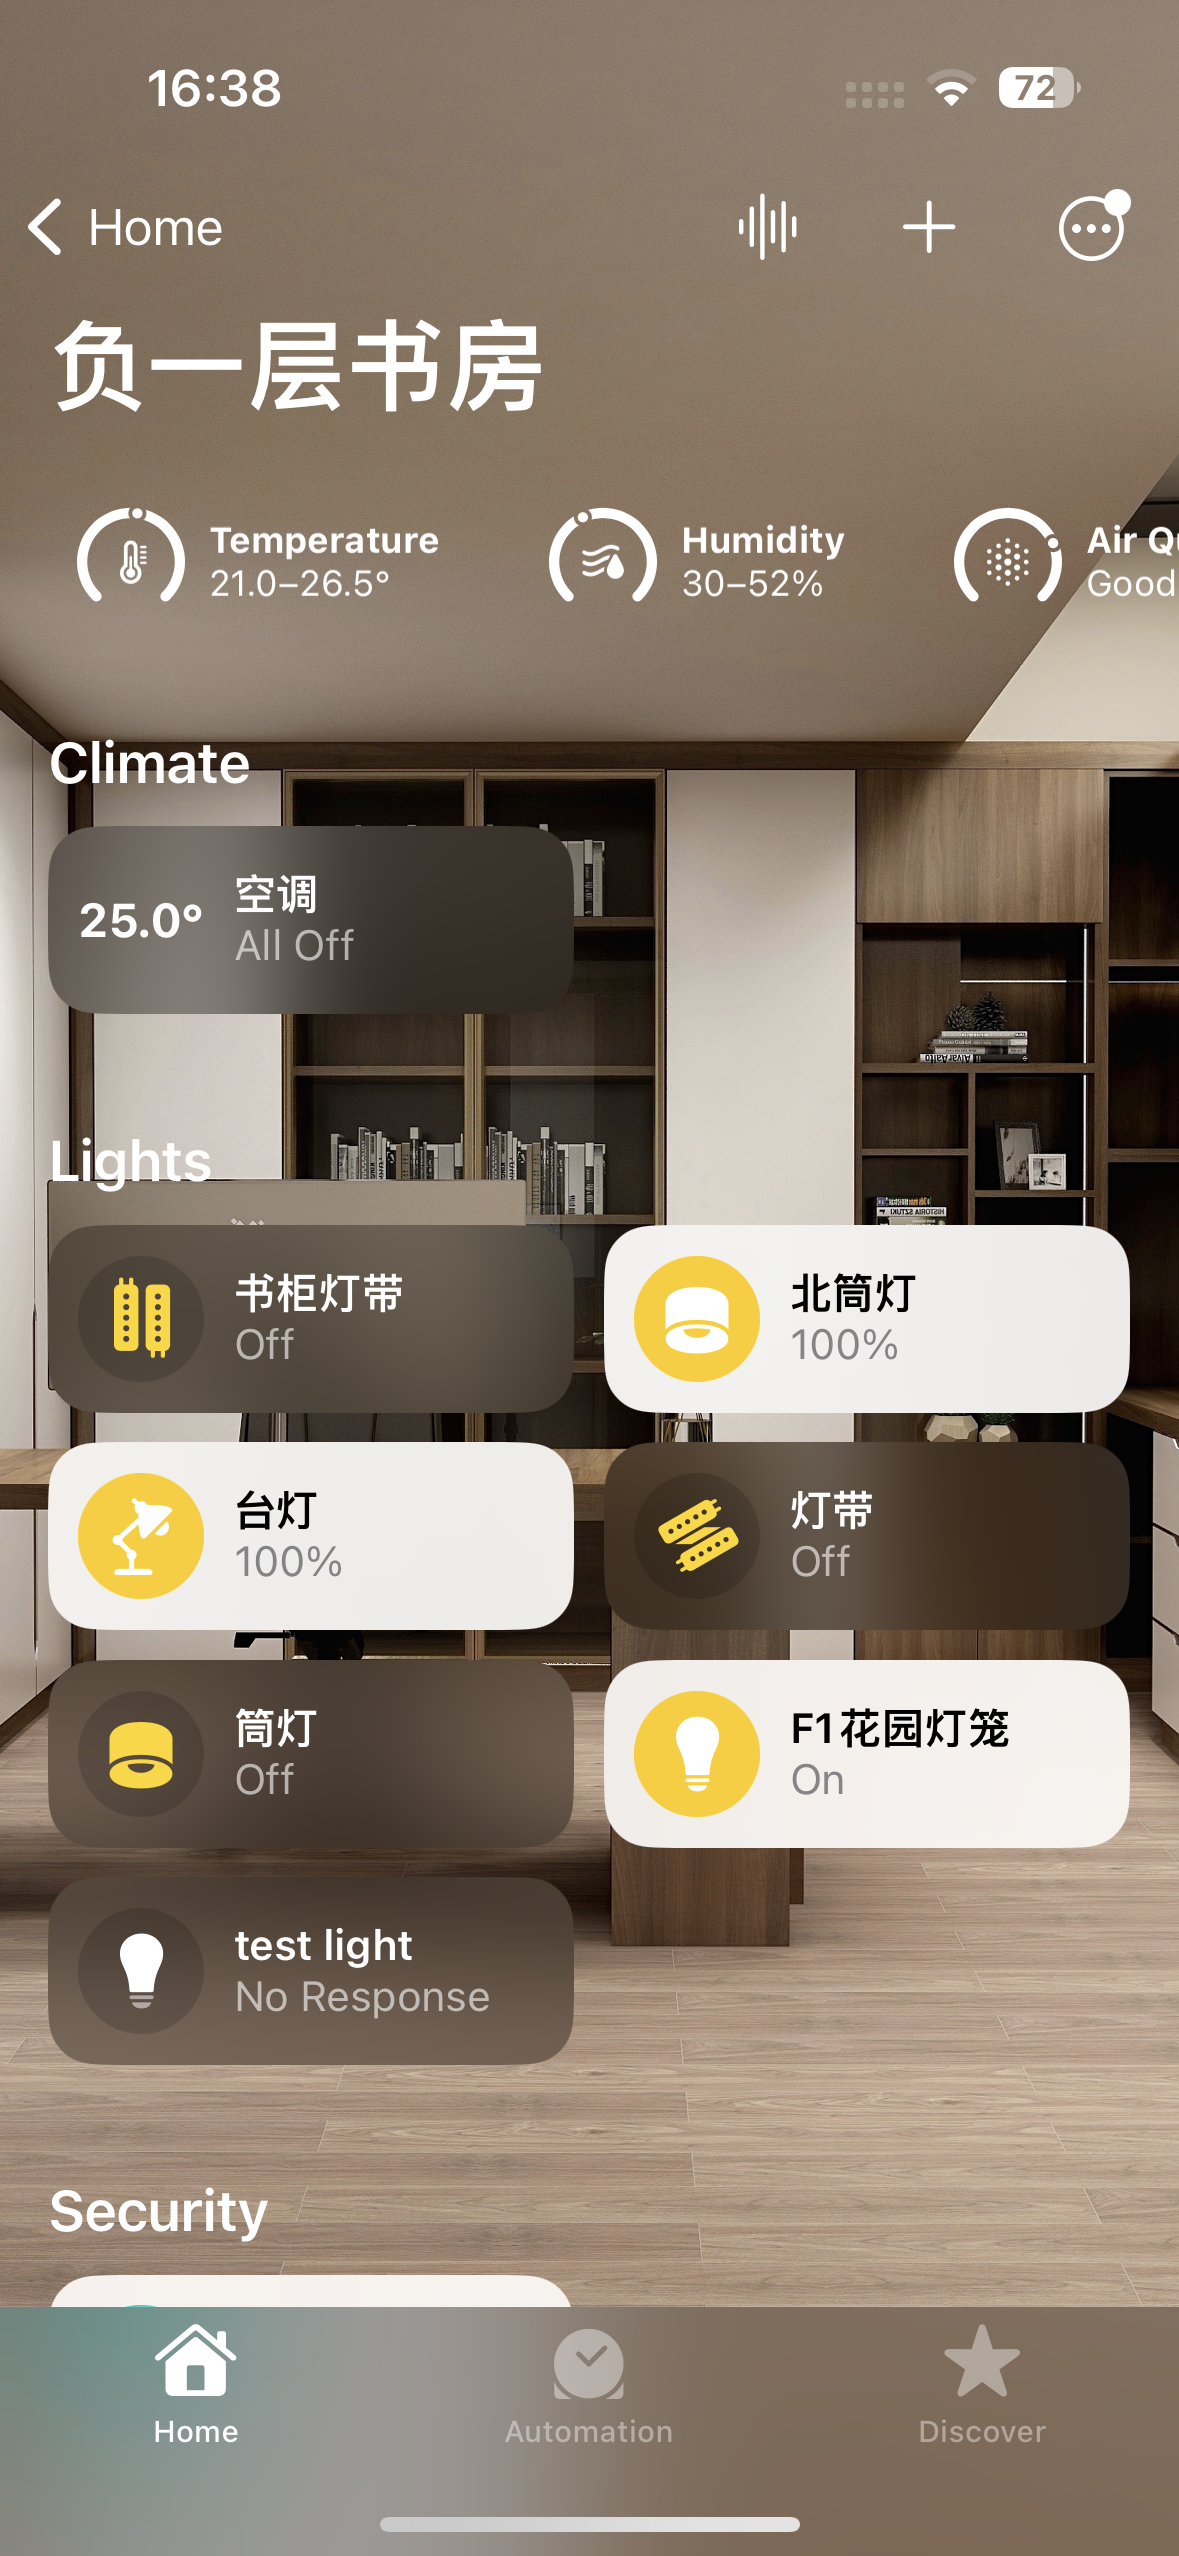
将大金空气传感器接入ESPHome平台后,便可方便的应用于Home Assistant智能家居系统和苹果的HomeKit系统,并且可以建立自动化场景,用于自动调节室内空气质量。例如:当二氧化碳浓度到达800ppm以上时将新风系统调高一档;或者在PM2.5浓度达到30ug/m³以上时启动新风的全效过滤功能等等。下图是我的部分应用截图:
After the Daikin air sensor is connected to the ESPHome platform, it can be easily applied to the Home Assistant and HomeKit, and an automation scene can be established to automatically adjust the indoor air quality. For example: when the carbon dioxide concentration reaches above 800ppm, turn up the fresh air system; or when the PM2.5 concentration reaches above 30ug/m³, start the full-effect filter function of the fresh air, etc. The picture below is a screenshot of part of my application:

如果你有兴趣继续挖掘这个大金空气传感器的潜力,其实还可以有很多有趣的应用。还记得面板上的那4个LED吗?它可是从主板上引出了4个GPIO,万能的群友们将这个面板改造为了3颗RGB LED灯和一个光线传感器。另外,在外壳上原本就集成了一个标准的USB插座,利用这个插座我们也可以将其他的零组件接入这个传感器的系统当中,还有玩家们将OLED显示屏也集成到了这个传感器上,不需要手机APP就可以随时查看空气质量的各项参数。大金空气传感器的内部空间富裕,我们大可自己动手,将它改造为自己想要的各种设备。
If you are interested in continuing to explore the potential of this Daikin air sensor, there are actually many interesting applications. Remember those 4 LEDs on the front panel? It leads to 4 GPIOs from the mainboard, and some guys transformed this panel into 3 RGB LED lights and a light sensor. In addition, a standard USB socket is originally integrated on the shell. With this socket, we can also connect other components to the sensor system. Some DIYers have also integrated OLED displays into this sensor. You can check various parameters of air quality at any time without a mobile. The internal space of the Daikin air sensor is rich, we can do it ourselves and transform it into various devices we want.
以下是网友们的改造截图:(以下图片和应用图来自网络,非本人作业,向这些大神们致敬!)
The following is a screenshot of the creations from some DIYers: (The following pictures are from the Internet, they’re great!)


If you are interested in DAIKIN Air Sensor, welcome to our AliExpress store to buy a brand new one directly.
Donation to our site
Donate by PayPal
Please donate a small amount to help us running this site if you think we did a pretty good job.
2 Comments
石刻通道 · 2025-12-29 at 08:00
你们的博客 百分百 分享经验。多写些!
Josephfah · 2025-12-29 at 14:47
我热爱 度假栏目。有帮助学到新知识。 羅塞塔石碑 您 真的 激励出行。继续!